Fabric Requirements
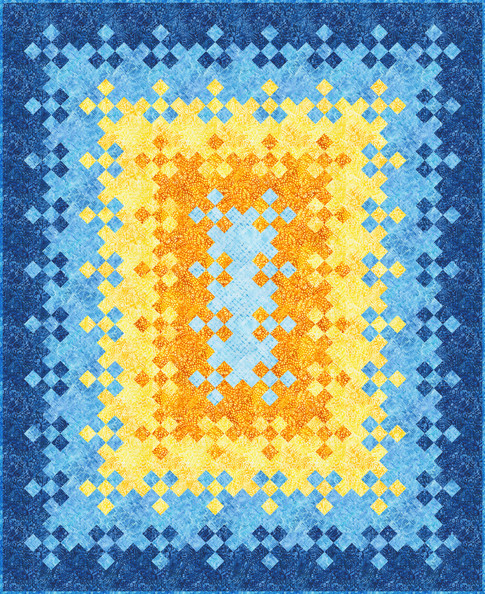
To achieve the stunning color transitions of this quilt, you’ll need five coordinating fabrics plus binding and backing:
-
Fabric A (SKY): ½ yard
-
Fabric B (BLUE): 1 yard
-
Fabric C (ORANGE): 1⅝ yards
-
Fabric D (INDIGO): 2⅛ yards
-
Fabric E (LEMON): 2¼ yards
-
Binding (ROYAL): ⅔ yard
-
Backing: 5¾ yards
Fabric amounts are based on 42” wide fabric.
Tools & Notions
Cutting Instructions
Follow these cutting steps for accuracy:
-
Fabric A:
-
Fabric B:
-
Fabric C:
-
Fabric D:
-
Fabric E:
-
Two 9¾” x WOF strips → eight squares, cut each twice diagonally (32 side setting triangles)
-
One 5⅛” x WOF strip → two squares, cut once diagonally (4 corner triangles)
-
Eight 4” x WOF strips for outer border
-
Eight 2½” x WOF strips for strip piecing
-
Binding Fabric:
Sewing the Nine Patch Blocks
This quilt is built from multiple variations of nine-patch blocks that gradually shift fabric colors. Strip piecing is the most efficient method.
A/B Blocks (Make 8)
-
Step 1: Sew Fabric A + Fabric B + Fabric A strips. Cut into sixteen 2½” units.
-
Step 2: Sew Fabric B + Fabric A + Fabric B strips. Cut into eight 2½” units.
-
Step 3: Combine the units to form nine-patch blocks measuring 6½” square.
B/C Blocks (Make 16)
-
Step 4: Sew Fabric B + Fabric C + Fabric B strips. Cut into thirty-two 2½” units.
-
Step 5: Sew Fabric C + Fabric B + Fabric C strips. Cut into sixteen 2½” units.
-
Step 6: Assemble into nine-patch blocks.
C/D Blocks (Make 24)
-
Step 7: Sew Fabric C + Fabric D + Fabric C strips. Cut into forty-eight 2½” units.
-
Step 8: Sew Fabric D + Fabric C + Fabric D strips. Cut into twenty-four 2½” units.
-
Step 9: Assemble into nine-patch blocks.
D/E Blocks (Make 32)
-
Step 10: Sew Fabric D + Fabric E + Fabric D strips. Cut into sixty-four 2½” units.
-
Step 11: Sew Fabric E + Fabric D + Fabric E strips. Cut into thirty-two 2½” units.
-
Step 12: Assemble into nine-patch blocks.
Quilt Assembly
-
Layout: Arrange blocks into seventeen diagonal rows following the color gradient diagram.
-
Row Construction: Sew blocks together into rows, pressing toward the square units. Attach side setting triangles to each row end.
-
Center Assembly: Join rows to complete the quilt center. Attach corner setting triangles.
-
Borders: Measure quilt through the center and cut two side borders to length. Attach and press. Repeat for top and bottom borders.
-
Finishing: Baste, quilt as desired, and bind.
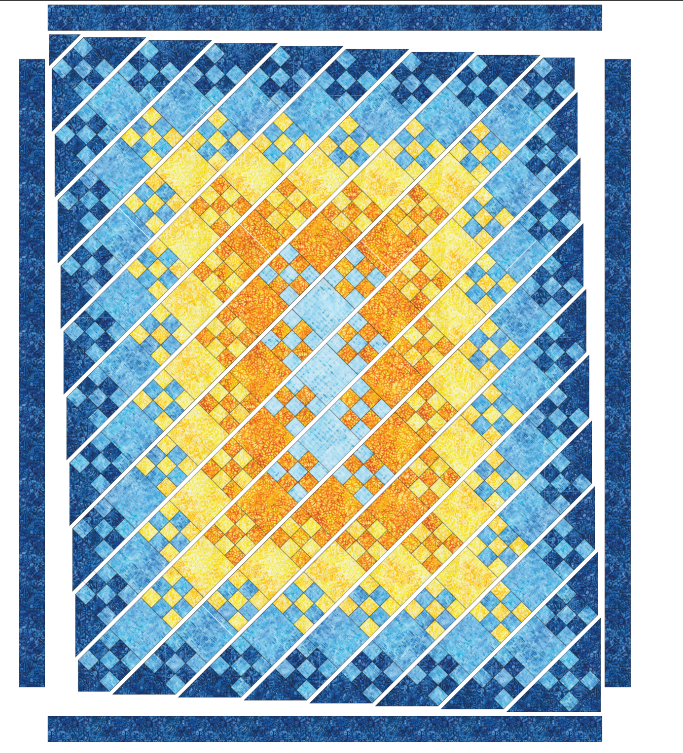
Diagram
Tips for a Perfect Blooming Nine Patch
-
Plan your colors: Lay out fabrics in a gradient before cutting to visualize transitions.
-
Press carefully: Press seams open for flatter blocks and crisper intersections.
-
Chain piece: Speeds up sewing and ensures consistency.
-
Use a design wall: Helps in arranging blocks and checking color flow.
📥 At the end of this post, you’ll find the free PDF pattern to download and follow along step-by-step.
Click here to access the free pattern
The Blooming Nine Patch quilt is a stunning celebration of both color and tradition. With its elegant blend of hues and the timeless appeal of nine-patch blocks, it’s a project that will reward you with a quilt full of movement, depth, and beauty. Whether you’re making it as a gift or for your own home, it’s sure to be a showstopper.