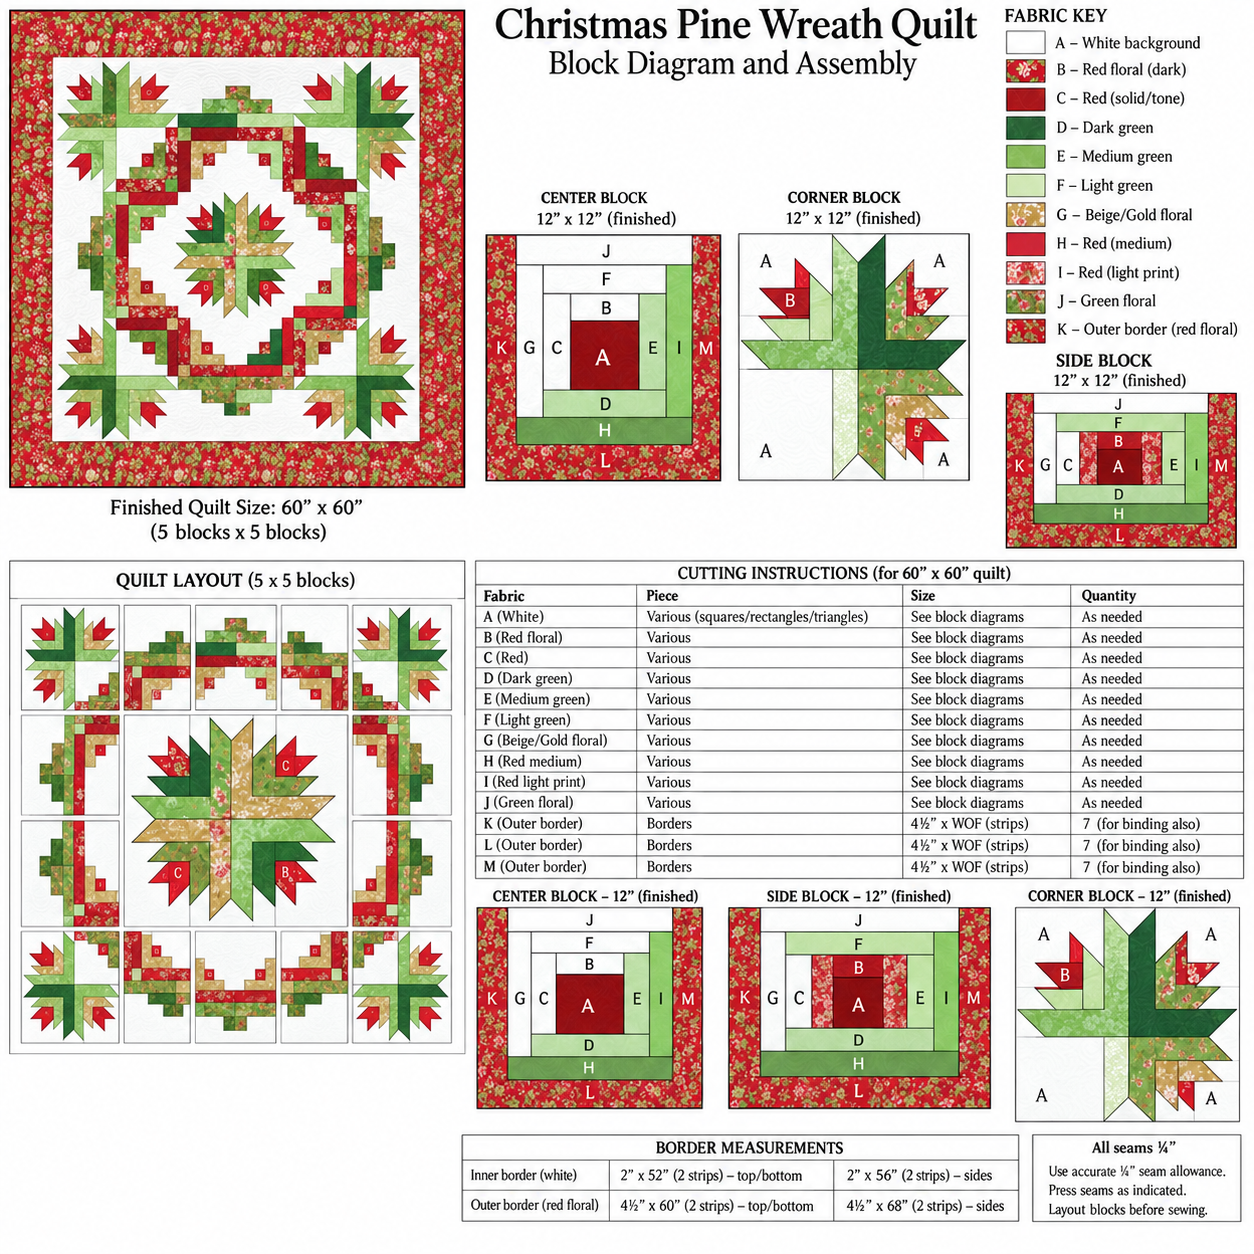
This detail is especially important when sewing the quilt because the orientation of each Log Cabin section changes depending on its position in the finished layout.
Understanding the Log Cabin Block
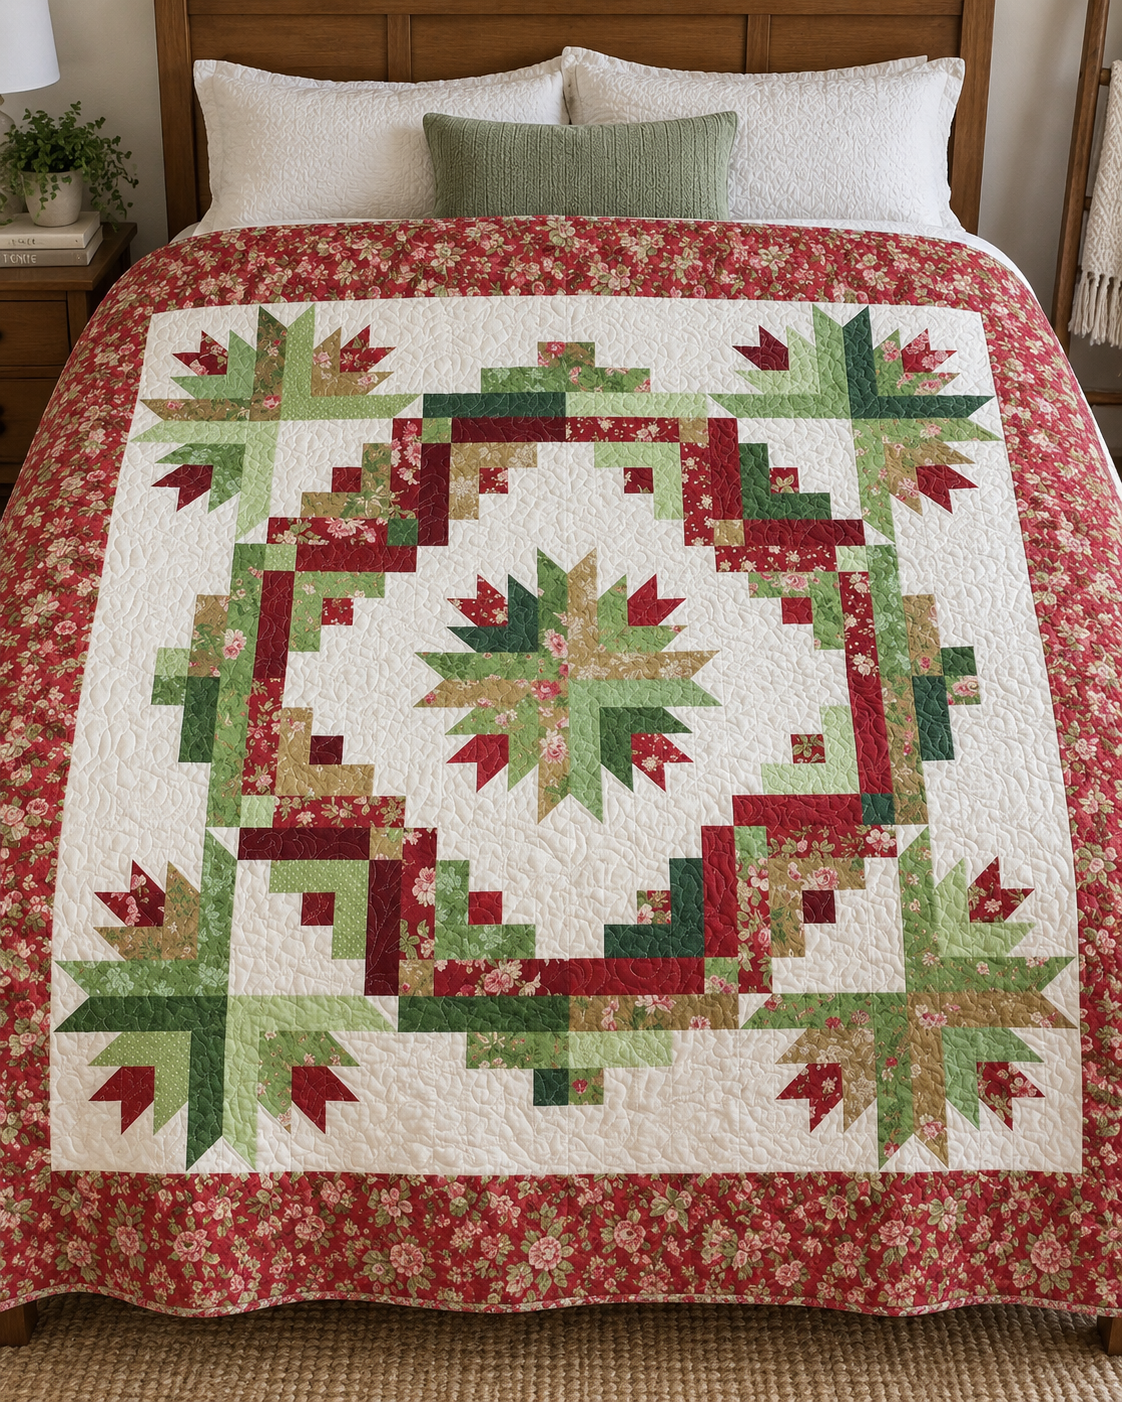
The Log Cabin blocks used in this quilt begin with a center square and are constructed by adding rectangular strips around it.
The center square can be made from a strong red fabric to create contrast. Lighter fabrics are then placed along selected sides, followed by progressively darker or more colorful strips.
The construction continues outward until the required block size is reached.
The basic order shown in the diagram follows the letters around the central square:
A – center square, followed by strips B, C, D, E, F, G, H, I, J, K, L, and M.
Each strip extends the block in a specific direction. Because the quilt uses these blocks to form a circular wreath, some completed blocks must be rotated before they are sewn into the final quilt.
This rotation is what produces the beautiful continuous Log Cabin frame.
Suggested Fabrics
This quilt is ideal for using a coordinated Christmas fabric collection. Mixing solids, tone-on-tone prints, and floral fabrics will give the design more depth.
For a traditional version, consider using:
- White or cream for the background
- Dark red and ruby red
- Red floral prints
- Dark forest green
- Medium green
- Light sage green
- Green floral prints
- Beige, gold, or champagne prints
- A bold red floral fabric for the outer border
The design would also look beautiful in completely different palettes. Blue and silver could create a winter version, while burgundy, cream, and antique gold could give the quilt a more elegant traditional look.
Constructing the Pine Blocks
The pine-style blocks are the most decorative elements of the quilt.
Each block is composed of long pointed pieces arranged around a central intersection. Several shades of green create the appearance of layered pine branches, while small red accents resemble berries or holiday flowers.
For the best result, prepare the pointed units carefully and press each seam before adding the next section.
Maintaining an accurate ¼-inch seam allowance is especially important when working with pointed pieces because even small variations can cause the finished block to become distorted.
If necessary, trim each completed unit before assembling the full block.
Creating the Center Block
The center block uses the same pine-inspired construction but combines more colors to make it the focal point of the quilt.
Floral greens, light greens, darker greens, beige or gold prints, and red accent fabrics can all be used together.
Because the center block sits inside a large white background area, the contrast between the colorful fabrics and the background helps the design stand out.
This is a wonderful place to use one of your favorite floral fabrics.
Building the Wreath
Once the individual blocks have been completed, arrange them on a design wall or large table before sewing.
The Log Cabin blocks must be rotated carefully so that the colored strips flow continuously around the quilt.
Begin with the four corner pine blocks. Then position the Log Cabin sections between them, checking that the darker fabrics form a consistent path around the interior.
Finally, place the large center pine block in the middle.
Before sewing anything together, step away from the layout and look at the entire quilt. This makes it much easier to notice a block that has accidentally been rotated in the wrong direction.
Assembling the Quilt Top
After confirming the layout, sew the blocks together in rows.
Press the seams in alternating directions whenever possible. This will help the seams nest together when the rows are joined.
Once all rows are assembled, sew them together to create the main quilt center.
The generous white background surrounding the colored motifs is an important part of the design. It creates visual balance and allows the wreath pattern to remain clearly visible.
Adding the Borders
A wide floral border finishes the quilt beautifully.
A red floral print works particularly well because it connects the reds inside the quilt with the outside edge.
You may also add a narrow white or cream border before attaching the floral border. This creates a small visual separation between the pieced quilt center and the strong outer print.
Measure the quilt through the center before cutting the border strips rather than simply measuring along the edges. This helps prevent wavy borders.
Quilting Ideas
The large background areas provide plenty of room for decorative quilting.
Swirls, feathers, snowflakes, vines, or flowing free-motion designs would all complement the traditional appearance of the quilt.
Inside the Log Cabin sections, simple straight-line quilting can emphasize the geometric construction.
The pine blocks can be quilted along the seams or lightly outlined to highlight their pointed shapes.
A combination of decorative background quilting and simple quilting within the pieced areas can create a very professional finish.
A Great Quilt for Christmas Fabric Collections
One of the biggest advantages of this pattern is its flexibility.
You do not need identical fabrics throughout the entire quilt. Using several coordinating reds, greens, and floral prints can actually make the design more interesting.
This makes the pattern perfect for Christmas fabric scraps, leftover strips, fat quarters, or pieces collected from previous holiday projects.
Try keeping the background consistent while varying the colored fabrics. The white background will unify the quilt even when many different prints are used.
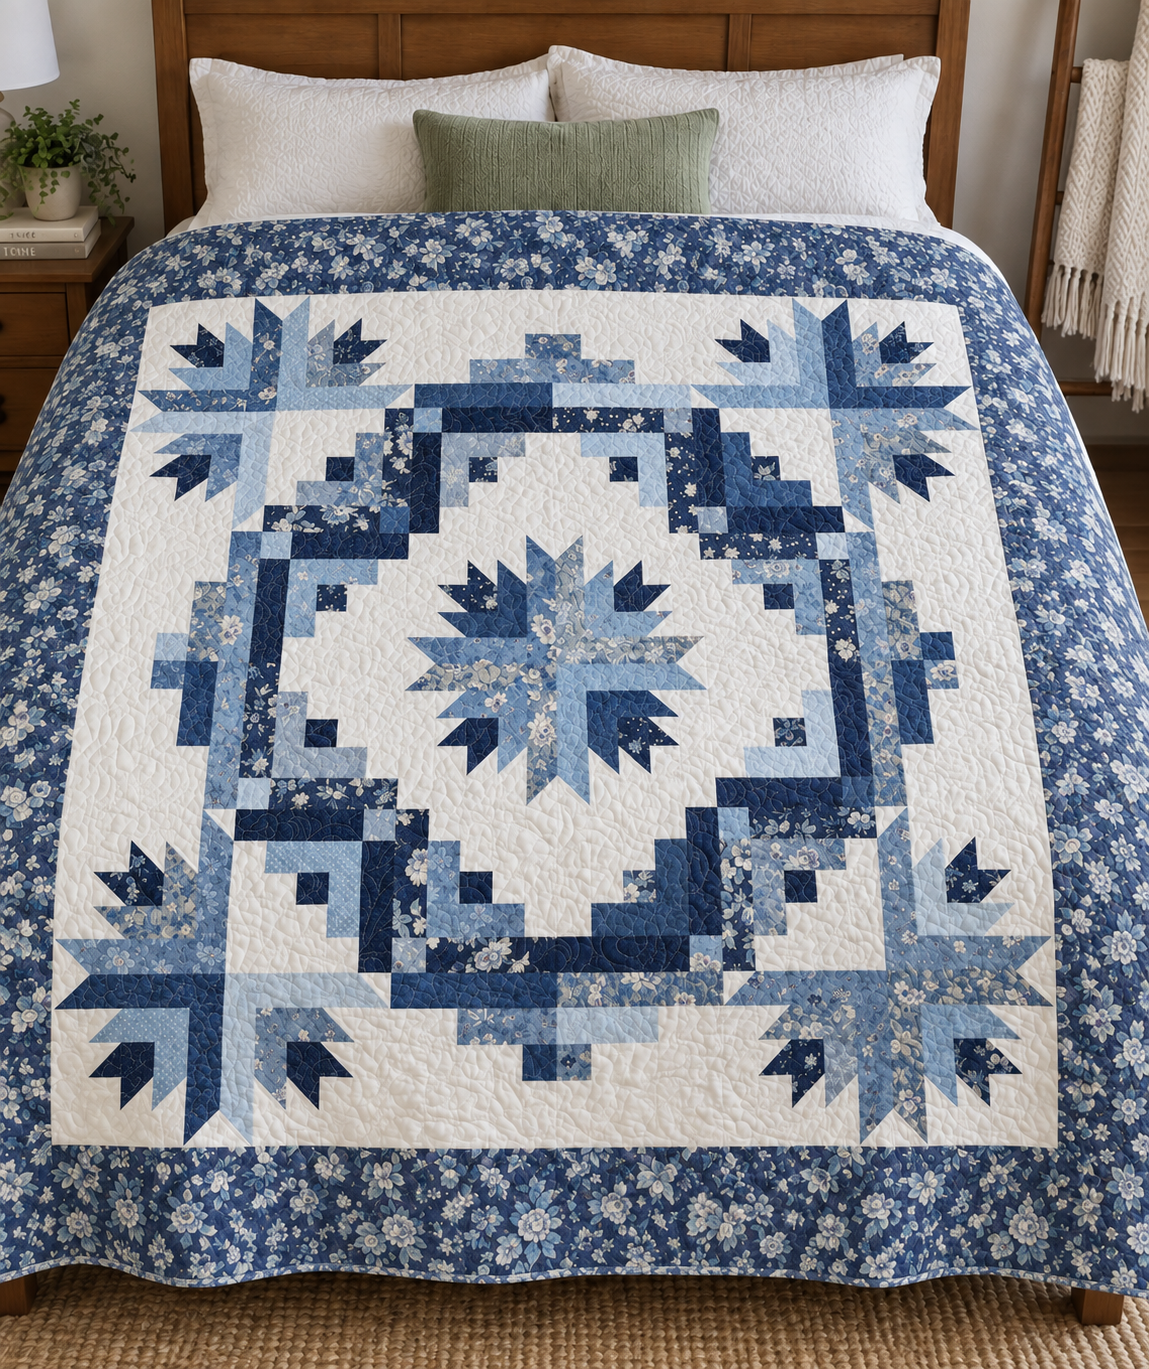
Christmas Pine Wreath Quilt Pattern
Tips for Better Results
Careful pressing and accurate cutting will make a significant difference with this pattern.
Because the Log Cabin strips build progressively around the center square, small measurement errors can accumulate. Check the block size several times while constructing each unit.
For the pointed pine blocks, avoid stretching bias edges while sewing.
It is also helpful to label the Log Cabin strips before starting. Letters such as A through M can be placed beside the cut pieces so that the assembly order remains easy to follow.
Christmas Pine Wreath Quilt Pattern PDF
The diagram makes this quilt much easier to understand because it shows the position and rotation of the Log Cabin blocks as well as the construction of the decorative pine sections.
I recommend studying the complete layout before cutting your fabrics. Once you understand how the Log Cabin blocks rotate around the quilt, the construction becomes much more straightforward.
At the end of this article, you can access the free Christmas Pine Wreath Quilt Pattern PDF, including the diagram and block layout to help you create your own version.
Christmas Pine Wreath Quilt Pattern PDF
The Christmas Pine Wreath Quilt is a wonderful combination of traditional patchwork and festive design. The Log Cabin construction gives the quilt movement, while the pine-style blocks create a beautiful seasonal focal point.
Whether you choose classic Christmas reds and greens or create your own color palette, this pattern offers plenty of opportunities to personalize the finished quilt.
Take your time with the block orientation, press carefully after each step, and arrange the entire quilt before joining the sections. Once the pieces come together, the circular wreath design begins to appear, making this an especially satisfying project to sew.