-
(1) 3¼” strip
-
(6) 3¼” x 3¼” squares
-
(4) 2¾” x 2¾” squares
-
(4) 1¼” x 2¾” rectangles
-
(2) 1” strips
-
(2) 1” x 12½” rectangles
-
(2) 1” x 11½” rectangles
Fabric B – Dark Purple:
-
(1) 3¼” strip
-
(2) 3¼” x 3¼” squares
-
(1) 2¾” x 2¾” square
-
(4) 1¼” x 1¼” squares
Fabric C – Purple:
-
(1) 3¼” strip
-
(4) 3¼” x 3¼” squares
-
(4) 2” x 2” squares
Fabric D – Medium Purple:
-
(1) 1¼” strip
-
(4) 1¼” x 2¾” rectangles
-
(8) 1¼” x 1¼” squares
Fabric E – Light Purple:
-
(1) 1¼” strip
-
(4) 1¼” x 2¾” rectangles
-
(8) 1¼” x 1¼” squares
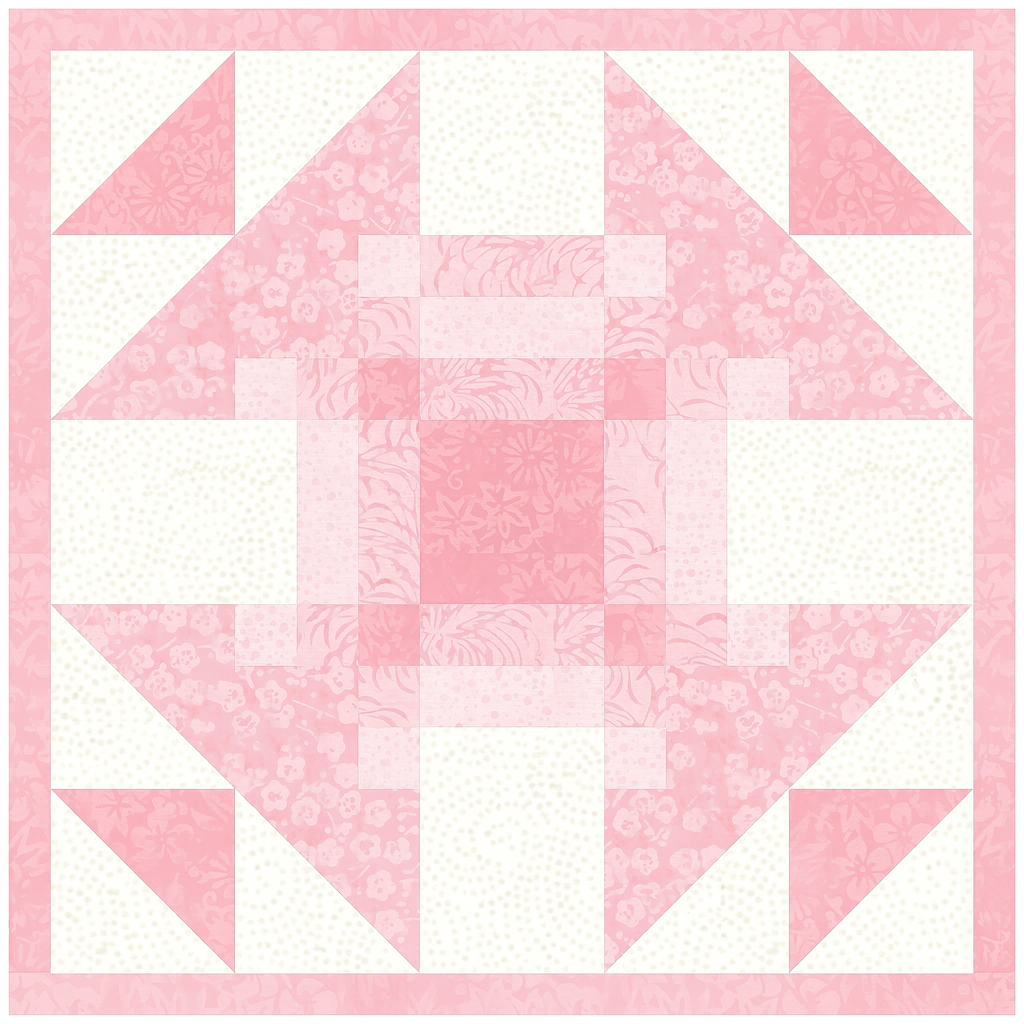
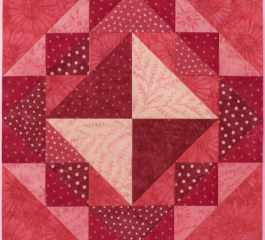
Step-by-Step Instructions
Step 1 – Make A/B HST Units
Place one Fabric A 3¼” square RST (right sides together) with one Fabric B 3¼” square. Draw a diagonal line, stitch ¼” on both sides of it, and cut along the drawn line. Repeat to make four A/B half-square triangles, each trimmed to 2¾” square.
Step 2 – Make A/C HST Units
Repeat the same process as Step 1, pairing Fabric A 3¼” squares with Fabric C 3¼” squares. Make eight A/C HSTs, each trimmed to 2¾” square.
Step 3 – Make A/E/D Units
Sew one Fabric A 1¼” x 2¾” rectangle to the top of one Fabric E rectangle of the same size. Then sew that unit to the top of a Fabric D rectangle. Repeat to make four A/E/D units, each measuring 2¾” square.
Step 4 – Make E/D/B Units
Sew a Fabric E 1¼” square to the left of a Fabric D square. Sew another Fabric E square to the top of the Fabric D square. Attach this E/D unit to the top of a Fabric B 1¼” square.
Step 5 – Make Corner Units
Sew the E/D/B unit from Step 4 to the bottom of a Fabric C 2” square, then attach another E/D/B unit to the left side. Repeat to make four corner units, each measuring 2¾” square.
Step 6 – Layout the Block
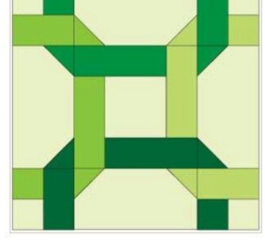
Using the block diagram as a guide, arrange the HSTs, corner units, Fabric A squares, and Fabric B squares, paying close attention to orientation for symmetry.
Step 7 – Assemble the Block Center
Sew units together in your preferred order — either joining the center first and then adding the outer pieces, or sewing in vertical/horizontal rows. Press seams open for a flatter block.
Step 8 – Add Borders
Sew the Fabric B 1” x 11½” strips to the left and right sides of the block center. Then sew the Fabric B 1” x 12½” strips to the top and bottom. Your Goose Goose Block is complete!
Tips for Success
-
Press seams open to reduce bulk and achieve crisp intersections.
-
Chain piece when making HSTs to save time.
-
Starch fabrics lightly before cutting for more accurate piecing.
-
Use a design wall or a flat surface to lay out pieces before sewing — this helps avoid orientation mistakes.
📥 At the end of this post, you’ll find the free PDF download with the full pattern and diagrams so you can follow along and start creating your own Goose Goose blocks today!
Click here to access the free pattern
The Goose Goose Block is a fun, versatile quilt block that blends traditional flying geese inspiration with extra visual detail. Its unique combination of shapes offers movement and texture, making it perfect for stand-alone projects or integrated into larger quilts.