Indigo Quilt Free Pattern

In the vibrant world of quilting, where colors dance and patterns tell stories, few hues possess the captivating allure of indigo. The deep, rich blue of indigo dye has enchanted artisans for centuries, weaving its way through cultures and epochs with timeless elegance. Today, we embark on a journey to explore the indigo quilt pattern, a classic motif that continues to inspire quilters around the globe.

Indigo holds a special place in the history of textiles. From its origins in ancient civilizations to its prominence in traditional Japanese artistry, indigo has been cherished for its depth and versatility. In quilting, this enchanting hue takes center stage, evoking a sense of calm, sophistication, and mystery.
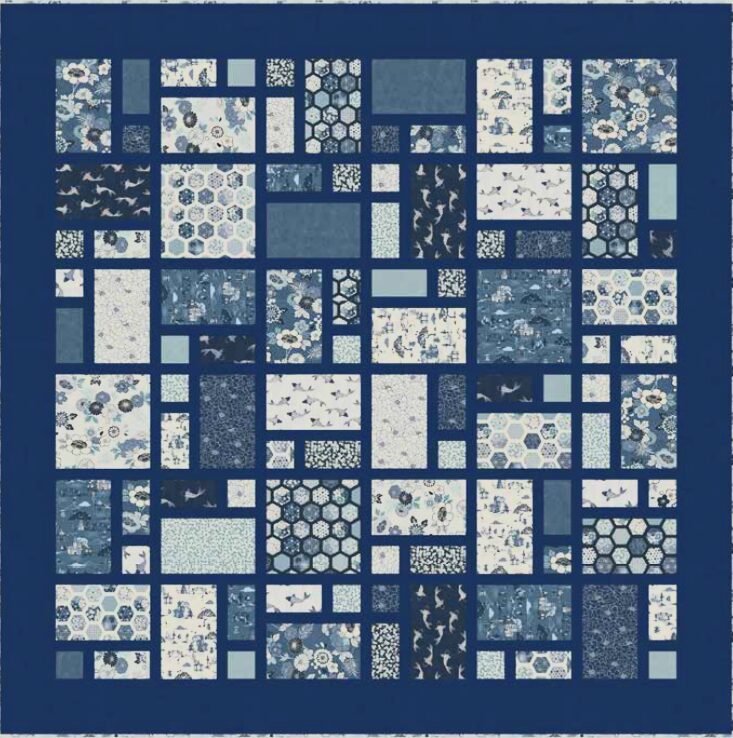
The beauty of indigo quilt patterns lies not only in their stunning visual appeal but also in their versatility. Whether you prefer modern geometric designs or classic patchwork motifs, indigo seamlessly blends with various styles and aesthetics, adding depth and character to any quilt project.

 Indigo Quilt
Indigo Quilt

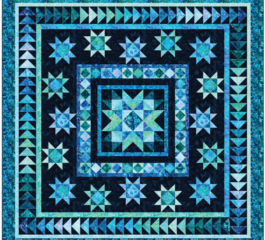
One of the most iconic indigo quilt patterns is the “Indigo Star.” This striking design features intricate star blocks set against a backdrop of deep indigo fabric, creating a mesmerizing interplay of light and shadow. The Indigo Star quilt pattern is a testament to the enduring allure of traditional quilt blocks, reimagined through the lens of indigo’s timeless charm.

Cutting the Fabrics:

Before diving into the creative process, it’s essential to prepare your fabrics with precision and care. Follow these steps to ensure your quilt project begins on the right foot:

  1. Cutting the Fabrics as Shown:
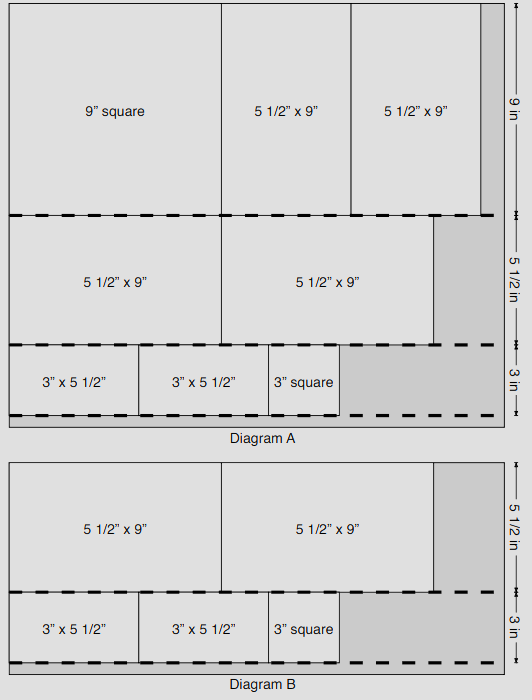
    • Refer to the fabric requirements table for guidance on cutting your fabrics. Diagrams A and B provide visual aids for cutting pieces from a Fat Quarter (FQ) and a Fat Eighth (F8th) respectively.
    • Start by cutting the FQs and F8ths into Width of Fabric (WOF) strips, then proceed to cut the required pieces according to the fabric requirements table.
  2. Cutting the Background (BKG) Fabric:
    • Prepare the BKG fabric according to the following instructions:
      • Cut sixteen 1 ½” WOF strips, each divided into four 9” lengths and two 3” lengths.
      • Sew seven 1 ½” WOF strips end to end, then cut them into five 56 ½” lengths.
      • Sew six 5 ½” WOF strips end to end, then cut them into two 56 ½” lengths and two 66 ½” lengths.

Making the Quilt:

With your fabrics meticulously cut, it’s time to piece together your quilt top. Follow these steps to assemble each block and bring your design to fruition:

  1. Piecing the Blocks:
    • Each pieced block comprises a 3” square, a 3” x 5 ½” rectangle, and sashing strips of BKG fabric.
    • Sash together the square and rectangle using a 1 ½” x 3” strip of BKG fabric.
    • Sash the resulting pieces to the side of a 5 ½” x 9” rectangle using a 1 ½” x 9” strip of BKG fabric.
  2. Assembling the Quilt Top:
    • Arrange the pieced blocks into six rows of six blocks each.
    • Sash each row together using five 1 ½” x 9” strips of BKG fabric.
    • Sash the rows together using the 1 ½” x 56 ½” strips of BKG fabric.
  3. Adding Borders:
    • Sash the sides of the quilt top with the 5 ½” x 56 ½” strips of BKG fabric.
    • Sash the top and bottom with the 5 ½” x 66 ½” strips of BKG fabric.

Finishing the Quilt:

As the quilt top takes shape, the final steps bring it to completion with finesse and attention to detail:

  1. Preparing the Binding:
    • Sew the binding strips end to end, creating a double-fold binding.
    • Press the binding wrong sides together along its length for a clean finish.
  2. Assembling the Quilt Sandwich:
    • Sew the backing fabric pieces together to create a large enough piece for the quilt back.
    • Create a quilt sandwich by layering the backing fabric, wadding, and quilt top, then baste them together.
  3. Quilting and Trimming:
    • Quilt the layers together as desired, then trim the quilt square, removing excess wadding and backing.
    • Consider quilting a diagonal cross-hatch pattern approximately 1 ½” apart for a classic touch.
  4. Binding the Quilt:
    • Carefully bind the quilt edges, mitering the corners for a polished look.
Indigo Quilt
Diagram

📥 Download your free PDF pattern below and embark on your indigo quilting adventure today! Happy quilting! 🧵✨

FREE PATTERN PDF

With the final stitches in place, step back and admire your indigo masterpiece. Whether you follow the suggested fabric layout or forge your own path, your indigo quilt is sure to enchant and inspire for generations to come.

Leave a Reply

Your email address will not be published. Required fields are marked *