Technique: Strip piecing and traditional piecing
Block Types:
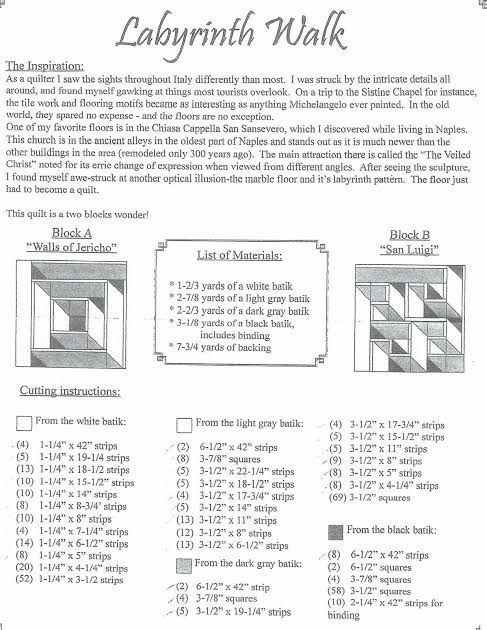
Materials List
To create this quilt, gather the following fabrics:
-
White Batik: 1¼ – 3 yards
-
Light Gray Batik: ⅝ – 1⅞ yards
-
Dark Gray Batik: ⅞ – 2¼ yards
-
Black Batik (includes binding): 1⅛ – 3¼ yards
-
Backing Fabric: 7¾ yards
Note: The range in yardage depends on the desired finished quilt size and number of blocks.
Cutting Instructions
Follow the cutting guide below to prepare your strips for piecing. All strips are cut width of fabric (WOF) unless otherwise noted.
From the White Batik:
-
(A) 9 – 1¼” x 42″ strips
-
(B) 1 – 1½” strip
-
(C) 5 – 1¾” strips
-
(D) 3 – 2¼” strips
-
(E) 3 – 2½” strips
-
(F) 2 – 3″ strips
-
(G) 2 – 3½” strips
-
(H) 3 – 4½” strips
-
(I) 3 – 5¼” strips
-
(J) 2 – 5½” strips
-
(K) 2 – 6½” strips
-
(L) 2 – 8½” strips
From the Light Gray Batik:
-
(M) 6 – 1½” x 42″ strips
-
(N) 2 – 1¾” strips
-
(O) 3 – 2¼” strips
-
(P) 3 – 2½” strips
-
(Q) 2 – 2¾” strips
-
(R) 2 – 3″ strips
-
(S) 2 – 3½” strips
-
(T) 2 – 4½” strips
-
(U) 2 – 5½” strips
-
(V) 2 – 6½” strips
-
(W) 2 – 9¼” strips
-
(X) 2 – 19¼” strips
From the Black Batik:
block
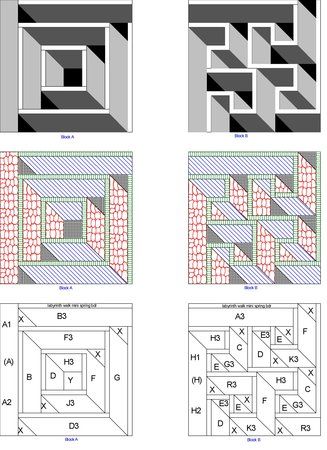
Block Construction
Block A – “Walls of Jericho”
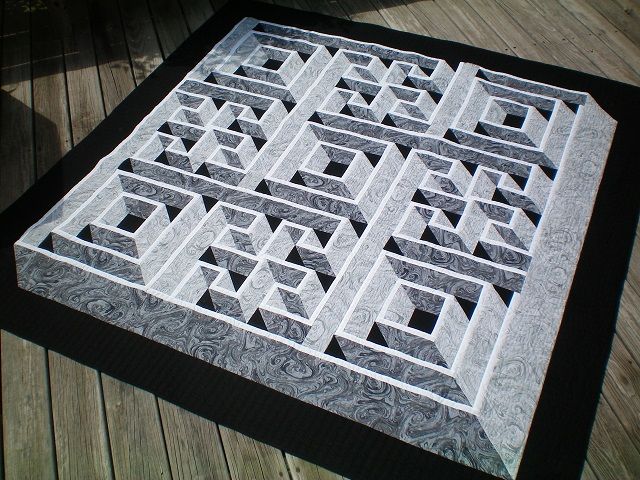
This block is constructed using a log cabin-style layout. Each round alternates color and increases in size, gradually forming a spiraling optical illusion. Strip widths increase as the rounds move outward. The use of white, gray, and black batiks adds contrast and depth to enhance the dimensional effect.
Tip: Use a design wall to help rotate and assemble the blocks properly—direction matters for the illusion!
Block B – “San Luigi”
Block B uses a more angular layout, made up of smaller rectangle units sewn from various strip widths. The units are pieced and rotated strategically to align with Block A, completing the maze-like illusion.
Both blocks rely heavily on precise strip cutting and consistent seam allowances for best results.
Assembly Instructions
-
Make your desired number of Block A and Block B units. The pattern alternates between these blocks in a checkerboard layout.
-
Lay out the blocks in rows, ensuring that the arrows and shadows created by the piecing align to maintain the illusion.
-
Sew blocks into rows, and then sew rows together.
-
Press seams carefully to reduce bulk and maintain accuracy.
Finishing the Quilt
-
Add your borders if desired (not included in the pattern diagram).
-
Layer the quilt top, batting, and backing.
-
Quilt as desired. Echo quilting or dense straight-line quilting can emphasize the geometry.
-
Bind using the 2½” strips of black batik.
Labyrinth Walk Quilt Pattern
The Labyrinth Walk Quilt is a captivating project that transforms simple strips into a mesmerizing design. It’s a celebration of color value, layout precision, and optical illusion. Whether you’re entering a quilt show or decorating your home, this quilt is sure to be a showstopper.