Trunk fabric: brown
Background fabric: white, cream, gray, or low-volume
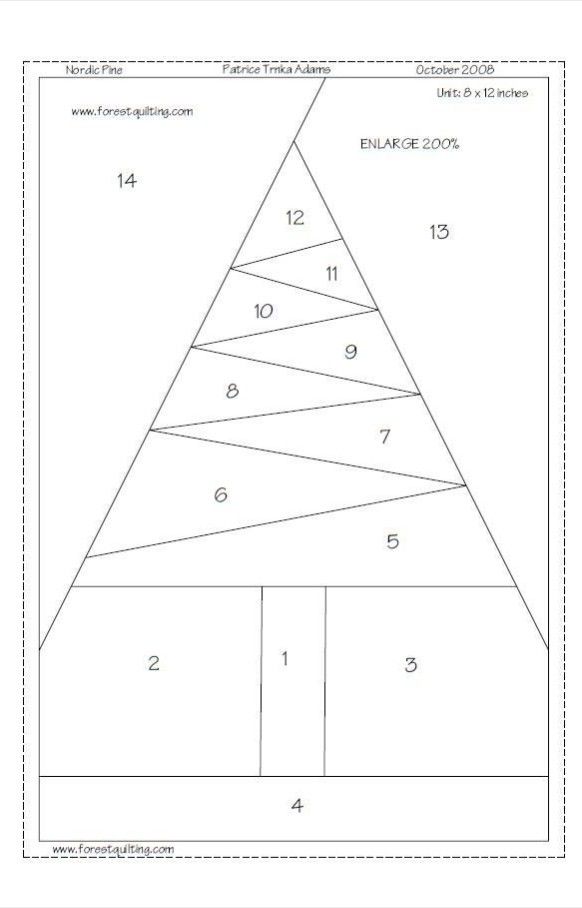
Printed foundation pattern (mirror image), enlarged 200% if making the larger block
Sewing machine with 1.5–1.8 mm stitch length
Rotary cutter, ruler, and mat
Iron and pressing surface
Paper scissors (for trimming the pattern)
Fabric scissors
Optional: lightbox for positioning
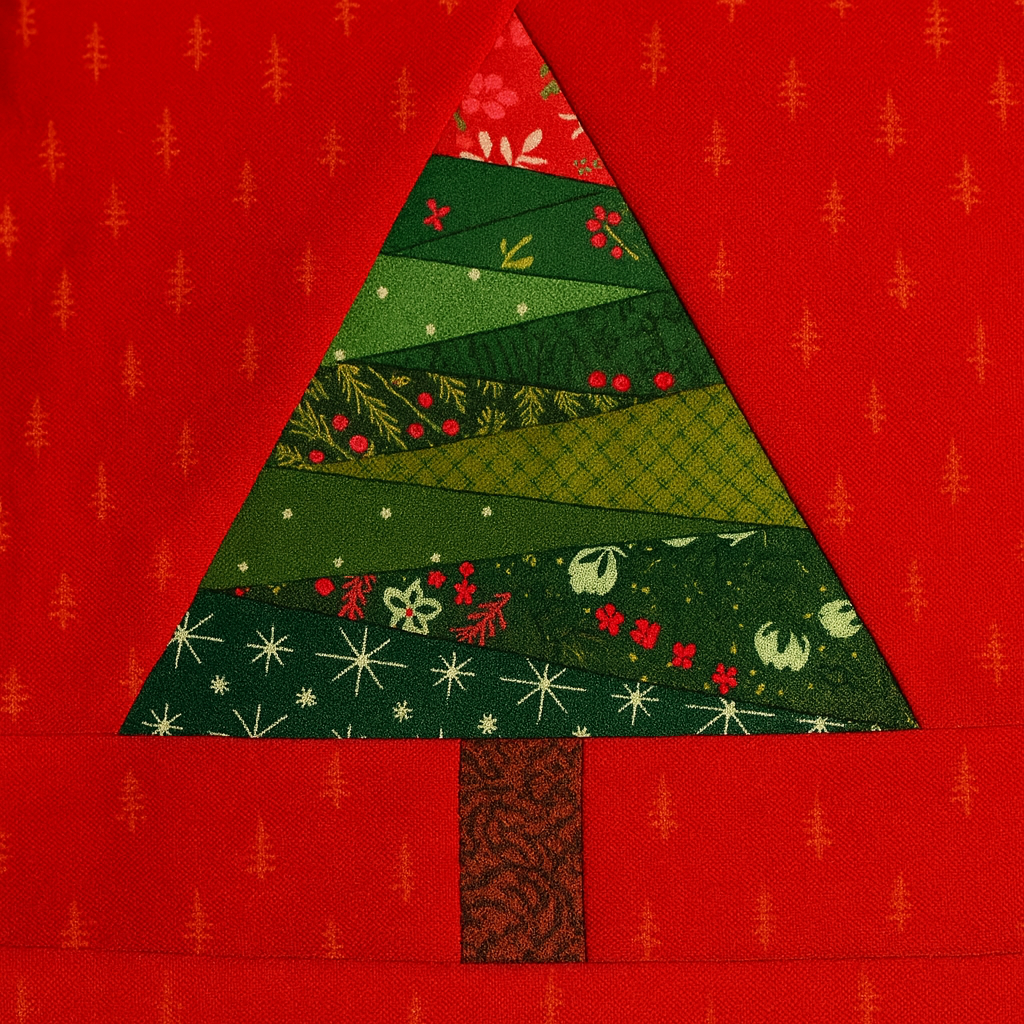
Understanding the Sections
The block is divided into numbered pieces (1–14), and you will sew them in numerical order as in any paper-piecing pattern.
-
1–3: Tree trunk
-
4: Ground strip
-
5–12: Tree layers
-
13–14: Background sides
Before You Begin
-
Print and trim the pattern, leaving ¼” margin around the outer dashed line.
-
If making a large block, enlarge the pattern to 200% before trimming.
-
Reduce your sewing machine stitch length to 1.5–1.8 mm to make paper removal easier.
-
Cut fabric pieces generously—FPP requires extra margin.
Cutting Guide (Recommended Oversized Cuts)
Since this is foundation paper piecing, the exact shapes don’t need to be pre-cut.
Use these guidelines:
Tree Trunk (1, 2, 3)
Ground Strip (4)
Tree Layers (5–12)
-
Pieces 5–12:
-
Cut strips approximately 3″ × width of the triangle area
-
Suggested: 3″ × 10″ for lower layers, 3″ × 6″ for upper layers
Background (13 & 14)
Step-by-Step Foundation Paper Piecing Instructions
1. Start With Piece 1
Place fabric for section 1 on the back of the paper, right side facing out.
Secure with a dab of glue or a pin.
2. Add Pieces 2 and 3
-
Place fabric for section 2 right sides together with piece 1, aligning the seam line.
-
Sew on the printed line between 1 and 2.
-
Flip fabric open and press.
Repeat for piece 3.
3. Sew Piece 4 (Ground Strip)
-
Place fabric for section 4 right sides together with the bottom edge of pieces 1–3.
-
Sew along the printed line, flip, and press.
4. Build the Tree Layers (5 to 12)
Work numerically:
-
Align each new piece right sides together along its seam line.
-
Sew directly on the printed line.
-
Flip and press after each seam.
These angled strips form the tree’s branches and give the design movement.
5. Add Upper Tree Sections (11 and 12)
These small triangles form the top of the pine.
Place carefully and press well.
6. Add Background Sides (13 and 14)
These two large side pieces complete the triangle shape.
7. Trim the Block
Use a rotary cutter to trim the block to the outer dashed line, which includes seam allowance.
8. Remove the Paper
Carefully tear along the stitch lines after trimming.
Final Block Size
Tips for Best Results
-
Press gently after each seam—no ironing back and forth.
-
Use a lightbox or window to ensure your fabric covers the entire section.
-
A small stitch length prevents seams from opening when the paper is removed.
-
Use starch or Best Press for crisp piecing.
Pattern
Whether you’re decorating your home, preparing handmade gifts, or simply enjoying the peaceful rhythm of quilting during the holidays, the Nordic Pine block is a project that brings joy from the first stitch to the final press. Below, you’ll find a complete step-by-step tutorial with cutting guides, sewing instructions, and helpful tips to ensure your block comes out beautifully.