Patchwork Slippers Tutorial

Looking for a fun and functional project that combines comfort, style, and your favorite fabric scraps? This Patchwork Slippers Tutorial is just what you need. Whether you’re treating yourself or making heartfelt gifts for friends and family, these slippers are a charming way to showcase your love for quilting in a cozy new form.

If you’ve ever wished you could wrap your feet in your favorite quilt, this project brings that dream to life! These patchwork slippers blend the warmth of quilting with the practicality of everyday wear. They’re soft, cozy, and totally customizable—from the colors and prints to the finishing details. Whether you’re making them as a weekend project or preparing handmade gifts for the holidays, this tutorial is both enjoyable and rewarding.

These quilted slippers bring together your favorite cotton prints, soft batting, and a simple construction method to create custom-fit footwear that’s perfect for chilly mornings or relaxing evenings at home. Plus, they’re a great scrap-busting project!

Patchwork Slippers Tutorial

Why You’ll Love This Project

  • ✅ Great for using up leftover fabrics

  • ✅ Makes a thoughtful handmade gift

  • ✅ Beginner-friendly construction

  • ✅ Customizable in size, color, and style

  • ✅ Includes a free printable PDF pattern

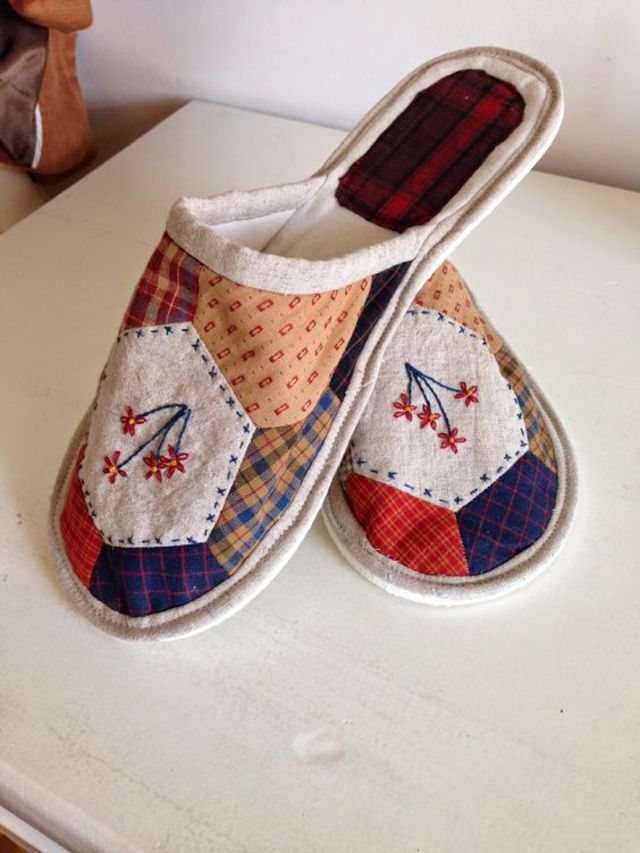
  • Instructions – Patchwork Slippers

    Step 1: Prepare the Pattern

    Download and print the PDF pattern (available at the end of this tutorial). Cut out the pieces and trace them onto your fabric and batting. You’ll need:

    • 2 outer sole pieces (patchwork)

    • 2 lining sole pieces

    • 2 batting sole pieces

    • 2 top patchwork pieces

    • 2 lining top pieces

    • 2 batting top pieces

    Step 2: Make the Patchwork

    Create a simple patchwork panel using your fabric scraps. You can use any layout you like: log cabin, squares, or improv piecing. Once your panel is large enough, cut out the top and sole shapes from it using your pattern.

    Step 3: Assemble the Upper Part

    Layer one patchwork top piece, one batting piece, and one lining piece with the right sides of fabric facing out. Quilt through all layers to hold them together. You can use simple straight lines or decorative quilting depending on your style.

    Repeat for the second slipper top.

    Step 4: Sew the Slippers Together

    Pin the quilted upper to the corresponding sole (patchwork outer sole + batting + lining). Make sure the edges align and the curved side of the upper is positioned over the top of the sole. Sew the pieces together using a ¼” seam allowance.

    Repeat for the second slipper.

    Step 5: Add the Sole Backing

    To add durability and comfort, sew the non-slip backing (like felt or faux suede) to the bottom of each slipper. You can hand-sew this or use your machine if it handles thicker layers.

    Step 6: Finish the Edges

    Bind the raw edges using bias tape or make your own binding with matching fabric. This step gives a neat finish and helps the slippers hold their shape.

    Optional Embellishments

    Add buttons, bows, or decorative stitching to personalize your slippers even more!

    👉 Click below to download the FREE PDF pattern and get started on your own pair of patchwork slippers today!

    👉 Click to download the FREE PDF pattern

    Final Thoughts

    These Patchwork Slippers are the perfect mix of comfort, creativity, and handmade charm. They’re quick to make, completely customizable, and a wonderful way to turn fabric scraps into something practical and beautiful. Once you make one pair, you’ll want to stitch up a set for the whole family!

    You might also be interested

    Easy Backpack Tutorial Free Pattern

    Easy Backpack Tutorial Free Pattern

    Are you looking for a beginner-friendly backpack project that lets you show off your love of...

    Basic Grey Pincushion

    Basic Grey Pincushion

    If you’re looking for a quick, satisfying quilting project that combines charm, functionality,...

    Mug Caddy Sewing Free Pattern

    Mug Caddy Sewing Free Pattern

    If you love both sewing and staying organized, the Mug Caddy Sewing Pattern is a fun and practical...

    Quilted Teapot – A Charming Touch for Your Kitchen

    Quilted Teapot – A Charming Touch for Your Kitchen

    There’s something delightfully nostalgic about a teapot resting on a cozy quilted mat. Whether...

    You Are Here: