Pineapple Blossom Quilt Pattern

Hello, dear quilting enthusiasts! Today on Quilting Wonders Tutorials, we’re diving into a delightful and timeless pattern that has captured the hearts of quilters for generations: the Pineapple Blossom Quilt.

This pattern is not only visually striking but also a wonderful way to hone your quilting skills. Whether you’re a seasoned quilter or a beginner looking for a new challenge, the Pineapple Blossom Quilt is sure to bring joy to your crafting journey.

The pineapple motif has long been a symbol of hospitality and warmth, making it a beloved design in various crafts, including quilting. The Pineapple Blossom Quilt pattern, with its intricate and layered look, adds a modern twist to this classic design. It combines the traditional charm of the pineapple block with a blossoming effect, creating a quilt that is both dynamic and elegant.

Materials You’ll Need

Before we start, let’s gather the materials you’ll need for this project:

  • Fabric: Choose a variety of fabrics for a scrappy look or a cohesive color palette for a more uniform design. You’ll need both light and dark fabrics to create the necessary contrast.
  • Rotary Cutter and Mat: Precision is key for this pattern, and a rotary cutter with a self-healing mat will help you achieve clean, accurate cuts.
  • Quilting Ruler: A good ruler will help you measure and cut your fabric pieces precisely.
  • Sewing Machine: Ensure your machine is in good working order, with a fresh needle and enough thread.
  • Pins and Clips: These will help you hold your pieces together as you sew.
  • Iron and Ironing Board: Pressing your pieces as you go is crucial for a crisp, professional finish.

Cutting Your Fabric

The Pineapple Blossom Quilt pattern requires careful cutting to achieve the desired effect. Here’s a basic guide for cutting your pieces:

  1. Center Square: Cut a 2.5-inch square from your chosen fabric.
  2. First Round: Cut four 2.5-inch by 2.5-inch squares and four 2.5-inch by 4.5-inch rectangles from contrasting fabrics.
  3. Second Round: Cut four 2.5-inch by 6.5-inch rectangles and four 2.5-inch by 8.5-inch rectangles.
  4. Third Round: Cut four 2.5-inch by 10.5-inch rectangles and four 2.5-inch by 12.5-inch rectangles.

Each round adds layers to your pineapple blossom, creating a blossoming effect that radiates from the center. The contrast between your fabric choices will highlight the intricate design.

Tips for Success

  • Precision is Key: Take your time cutting and piecing your fabric. Accurate measurements and straight seams will ensure your blocks fit together perfectly.
  • Press as You Go: Press your seams after each round to keep your blocks flat and your seams crisp.
  • Chain Piecing: To save time, consider chain piecing your blocks. This method involves sewing multiple pieces in a continuous line without cutting the thread between each piece.

Once you have all your blocks completed, lay them out on a design wall or the floor to arrange them in a pleasing layout. Play with the placement until you’re happy with the overall design. Then, sew your blocks together, row by row, pressing the seams between each row for a smooth finish.

Finally, add your borders, quilt your layers, and bind your quilt. The Pineapple Blossom Quilt is not only a beautiful addition to your home but also a testament to your quilting skills and creativity.

FREE PATTERN HERE!

📄✨ Exciting news! You can download the PDF of the Pineapple Blossom Quilt pattern below! ⬇️🧵🔽

FREE PDF HERE

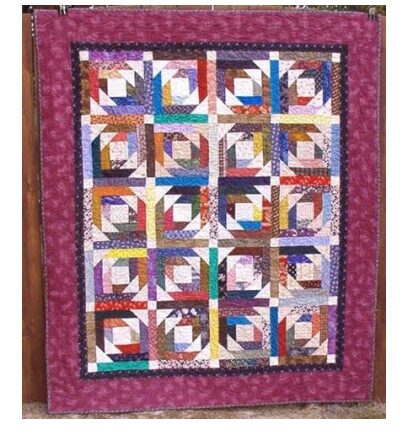
The Pineapple Blossom Quilt pattern is a stunning project that offers both a nod to tradition and a chance to explore your creative side. With its intricate design and endless possibilities for fabric choices, this quilt is sure to become a cherished heirloom. Happy quilting, and may your Pineapple Blossom Quilt bring warmth and beauty to your home!

Until next time, keep those needles moving and those fabrics flying!

Leave a Reply

Your email address will not be published. Required fields are marked *