(1) 2½” x 30″ strip in solid pink
(1) 2½” x 30″ strip in solid teal
This block is perfect for using precut 2½” strips (jelly rolls) or scraps from your stash!
🧵 Step-by-Step Instructions
Step 1: Sew the Strip Set
Place the three 2½” x 30″ fabric strips side by side (as shown in Diagram 1) and sew them together along their long edges.
Press the seams all in one direction.
👉 You now have a strip set measuring 6½” x 30″.
Step 2: Cut Squares
Cut the strip set crosswise into four 6½” squares (refer to Diagram 2). Each square will show the three-color stripe pattern.
Step 3: Assemble the Block
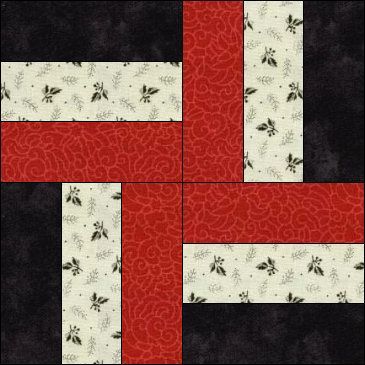
Using the layout in Diagram 3, rotate and join the squares in pairs to create a woven effect.
Sew the squares into two rows, then join the rows together.
Press the final seam in one direction. Your block should measure 12½” square unfinished.
🎨 Color Tips & Variations
-
Use high-contrast fabrics for bold visual impact
-
Try monochromatic tones for a modern look
-
Make a scrappy version using leftover jelly roll strips
-
For a playful quilt, alternate Rail Fence blocks with solid squares or alternate block types
📥 Download the Free Rail Fence Block PDF
👉 Download Rail Fence Block Pattern PDF
💡 Final Thoughts
The Rail Fence block is a fantastic building block for quilts of all sizes. Its simplicity makes it a great introduction to strip piecing, and its versatility ensures it’ll always have a place in your quilting toolbox. Whether you’re making one block or a hundred, you’ll love how fast and satisfying this pattern is to sew.
Ready to give it a try? Download the free pattern and start piecing your very own Rail Fence quilt today!