Ribbon Box Quilt Free Pattern

The Ribbon Box Quilt is a beginner-friendly project that’s perfect for showing off a beautiful fabric collection while creating a playful, ribbon-inspired design. Designed by Michelle Engel and featuring the Hidden Thicket fabric line by Leah Duncan for Cloud9 Fabrics, this quilt offers a charming combination of vertical and horizontal “ribbons” that look as if they’re woven together.

With its bold lines and clear structure, this quilt works beautifully with prints, solids, or a mix of both. The layout is straightforward enough for newer quilters, but its clever ribbon detail keeps it visually interesting for more experienced makers.

Quilt Size

Finished size: 45″ x 59″

Ribbon Box Quilt Free Pattern

Materials Needed

This project uses 8 different printed fabrics plus a background fabric.

  • Background fabric: 1½ yards

  • 8 different prints: ⅓ yard each

  • Binding: ½ yard

  • Backing: 3¼ yards

  • Batting to fit your finished quilt size

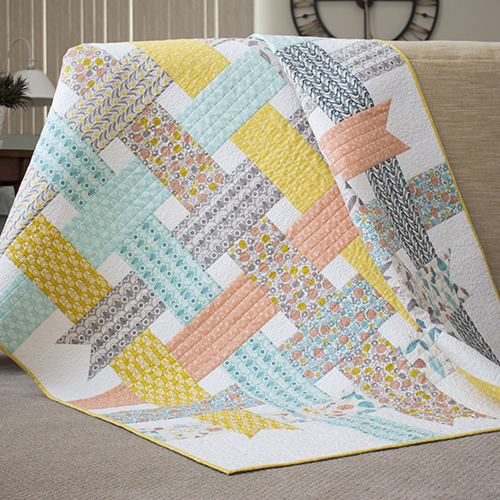
  • Tip: For consistent ribbon patterns, cut pieces horizontally across the fabric.

    Cutting Instructions

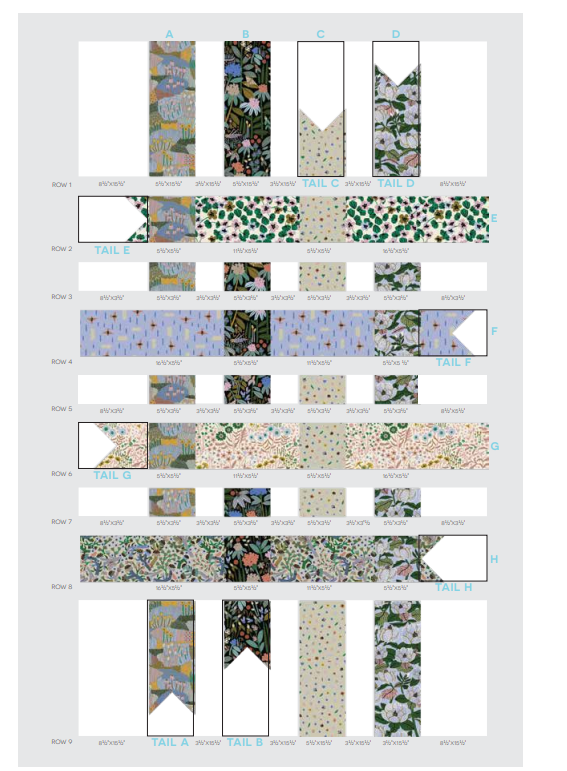
    Refer to the PDF pattern for full diagrams and cutting charts.

    From each fabric (A–H), cut a variety of rectangles and squares in sizes such as:

    • 16½” x 5½”

    • 11½” x 5½”

    • 5½” x 15½”

    • 5½” x 6½”

    • 3½” x 5½”

    • 3″ squares (for ribbon tails)

    From the background fabric, cut rectangles and squares for spacing, including:

    • 8½” x 15½”

    • 8½” x 3½”

    • 5½” x 5½”

    • 3½” x 15½”

    • 3½” x 3½”

    Making the Ribbon Tails

    1. Mark: Draw a diagonal line on the wrong side of all 3″ printed squares.

    2. Sew to Background: Place a 3″ printed square right sides together with a background square or rectangle corner. Stitch on the marked line, trim ¼” away, and press toward the print.

    3. Repeat: Each ribbon tail requires two corners to be sewn this way. Follow the pattern to match tails to their corresponding fabric rectangles.

    Assembling the Quilt

    1. Arrange Pieces: Lay out all pieces according to the quilt diagram in the PDF, working row by row.

    2. Sew Rows: Join pieces into rows, pressing seams in alternating directions for easier matching.

    3. Join Rows: Sew the rows together, pressing seams in one direction.

    4. Finish: Layer quilt top, batting, and backing. Baste, quilt as desired, and bind.

    Tips for Success

    • Pay attention to print direction for a cohesive ribbon effect.

    • Chain piece where possible to save time.

    • Press carefully after each step for crisp, accurate seams.

    📥 At the end of this article, you can download the complete PDF pattern with detailed diagrams and cutting charts to guide you step-by-step.

    PDF pattern

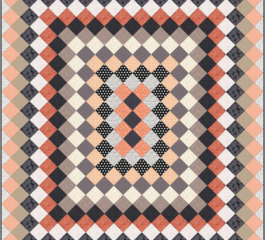
    With its clever design and approachable construction, the Ribbon Box Quilt is a satisfying project for quilters of all levels. Whether you use a cohesive fabric collection or mix and match your scraps, this quilt will be a standout piece.

    You might also be interested

    Blooming Nine Patch Quilt

    Blooming Nine Patch Quilt

    The Blooming Nine Patch Quilt is a masterpiece of color progression and traditional piecing. Known...

    Triangles and Squares Quilt Pattern

    Triangles and Squares Quilt Pattern

    If you’re looking for a modern yet simple quilt project that plays with classic shapes, the...

    Aunt Gracie’s Garden – FREE Quilt Pattern

    Aunt Gracie’s Garden – FREE Quilt Pattern

    Step into a world of nostalgia and color with the Aunt Gracie’s Garden Quilt Pattern, a delightful...

    LOG CABIN CROSS

    LOG CABIN CROSS

    One of the joys of quilting is discovering just how versatile traditional blocks can be. The evening...

    You Are Here: