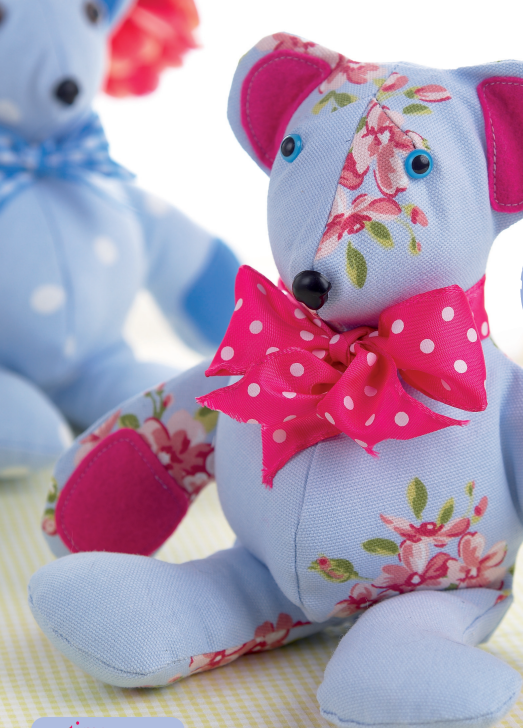
Materials Needed
Based on the pattern guide, you will need the following supplies:
- Cotton fabric or soft plush fabric
- Felt for patches (ears, hands, or soles)
- Polyester toy filling
- Plastic safety eyes and nose
- Ribbon for decoration
- Sewing machine
- Thread
- Scissors
- Pins
- Needle for hand sewing
The instructions recommend using soft materials and quality stuffing to help achieve a smooth, rounded shape and comfortable feel.
Finished Size
Approximate Height:
About 14 cm (5.5 inches)
This small size makes the teddy bear ideal for gifts, nursery decor, or collectible handmade toys.
Step-by-Step Teddy Bear Instructions
Step 1: Sew the Head
Start by stitching the darts on the head pieces to shape the bear’s face.
Join the head sections together carefully, aligning the seams.
This step creates the rounded form that gives the teddy its classic look.
Step 2: Attach the Ears and Face Details
Sew the inner ear pieces to the outer ears, then attach them to the head.
Secure the safety eyes and nose in place.
Take time to position the facial features carefully, as their placement gives personality and character to the bear.
Step 3: Sew the Arms and Legs
Stitch the arm and leg pieces together in pairs, leaving a small opening for turning and stuffing.
Turn the pieces right side out and fill them firmly with stuffing.
This helps the limbs keep their shape and feel soft.
Step 4: Assemble the Body
Sew the front and back body pieces together, leaving a gap for stuffing.
Attach the arms and legs securely.
Once assembled, fill the body with stuffing until it feels evenly rounded.
Step 5: Finish the Teddy Bear
Close the opening using a hand stitch.
Tie a ribbon around the bear’s neck for a classic finishing touch.
The original instructions suggest stuffing the legs first, then the arms and head, leaving the ears unfilled for a natural shape.
Tips for a Beautiful Result
- Use a knitting needle or chopstick to push stuffing into small areas
- Clip curves carefully to create smooth edges
- Choose soft, durable fabrics
- Sew slowly around curves for better control
- Add embroidered initials for personalization
These small details can make your teddy bear look more professional and long-lasting.
Creative Variations to Try
One of the joys of making teddy bears is customizing them to suit different occasions or personalities.
Fun ideas:
- Use patchwork fabrics for a quilt-style teddy
- Add a small quilt or blanket accessory
- Make seasonal bears with holiday fabrics
- Create matching bears for siblings
- Use recycled fabric from clothing or blankets
You can even resize the templates to create a whole teddy bear family.
Where to Use This Teddy Bear
This project is perfect for:
- Baby shower gifts
- Nursery decorations
- Handmade toy collections
- Memory keepsakes
- Holiday presents
- Charity or donation projects
A handmade teddy bear often becomes a cherished item that lasts for many years.
The Teddy Bear Free Pattern is a heartwarming project that combines simple sewing techniques with creativity and personal expression. It’s a wonderful introduction to toy-making and a rewarding project for quilters and crafters of all skill levels. Whether you’re making one bear or several, each finished piece carries a special handmade touch that makes it truly unforgettable.
Teddy Bear Free Pattern
And as we often celebrate here on Quilting Wonders, the best projects are the ones that bring comfort, joy, and lasting memories one stitch at a time.