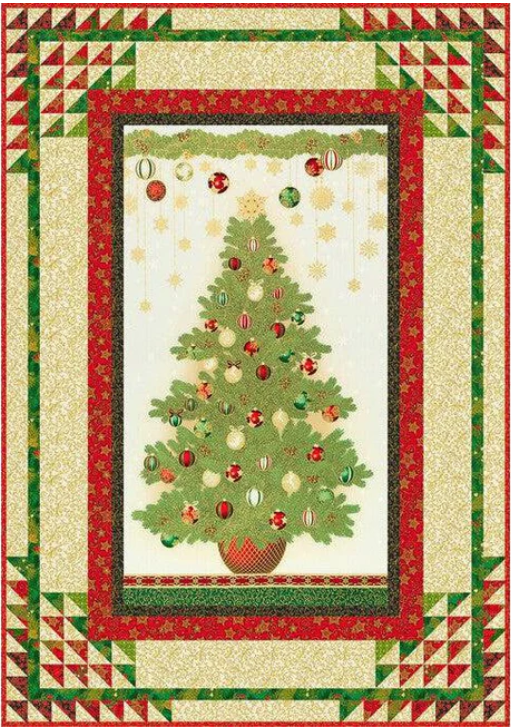
The magic of this quilt lies in the color combinations—each border is made with different blends of fabrics to create eye-catching geometric effects. The PDF includes three beautiful colorstories:
-
Blue Colorstory – cool, wintery, and serene
-
Holiday Colorstory – warm reds, greens, and festive tones
-
Onyx Colorstory – elegant blacks, silvers, and scarlets
Each gives the quilt a completely different personality.
Cutting Overview
The quilt top uses:
-
A fussy-cut center panel
-
Borders made from strips in various widths
-
Half-Square Triangles trimmed to 2½”
-
Long border strips sewn together end-to-end, then trimmed to size
Careful pressing and accurate trimming will make your borders fit perfectly around the center panel.
How to Make the Half-Square Triangles (HSTs)
Most of the decorative borders are built from colorful HST units.
The process is simple:
-
Pair one 3″ square of Fabric D with a 3″ square of another fabric (C, E, F, G, H, or I).
-
Place them right sides together.
-
Draw a diagonal line across the back of one square.
-
Sew ¼” away from both sides of the drawn line.
-
Cut on the marked line to make two HSTs.
-
Press and trim each one to 2½” square.
Repeat this process to create all the HST combinations listed in the pattern.
Assembling the Quilt Top
The quilt comes together in layers, adding border after border around the center panel.
1. Center Panel
Start by fussy-cutting the main panel to 22½” x 40½”.
2. Border 1
Use 1½” strips to frame all sides of the panel.
3. Border 2
Add 2½” strips on all sides.
4. Border 3
This is the first decorative border made with arranged HSTs.
Two different layouts are used:
Each arrangement follows the sequence shown in the pattern.
5. Border 4
Add a 1½” strip border to frame the HSTs.
6. Border 5
The final border uses another set of colorful HSTs with a slightly longer sequence on the top and bottom.
After attaching the last border, your quilt top is ready!
Download the Free PDF Pattern
At the end of your blog post, you can place your download link here:
➡️ Free PDF: Timberland Holiday Flourish Quilt Pattern
Finishing Your Quilt
Once the quilt top is assembled:
-
Baste the quilt layers.
-
Quilt as desired—straight-line quilting or gentle curves both look beautiful with this pattern.
-
Attach the binding using the 2½” strips you cut earlier.
Your seasonal quilt is now complete and ready to enjoy!