Other Materials
6 1/2″ square acrylic ruler with diagonal line
rotary cutter
Cutting mat
sewing machine
Coordinating thread
Pins or clips
Iron and pressing surface
Having a ruler with a diagonal guide makes trimming faster and ensures precise alignment for every block.
Cutting Instructions
From your assorted prints, cut a total of:
252 squares: 6″ x 6″
252 strips: 1 1/2″ x 8 1/2″
Accuracy in cutting is essential for achieving consistent block sizes and smooth assembly later on.
Piecing the Blocks
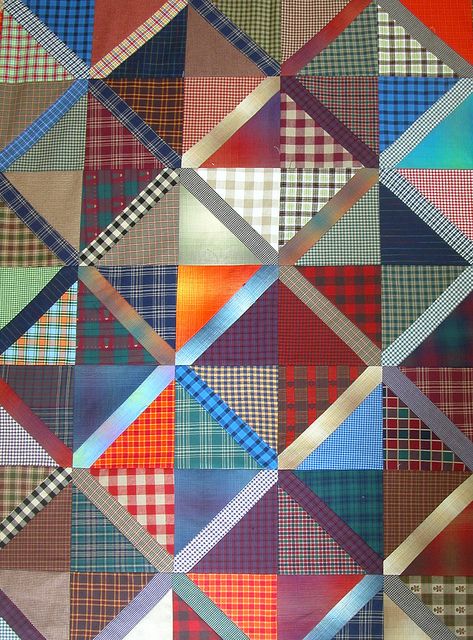
Step 1 – Create the Lattice Blocks
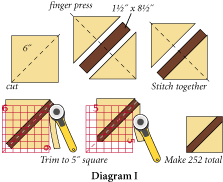
Cut each 6″ square in half diagonally to create 2 triangles.
Finger-press each triangle and one 1 1/2″ x 8 1/2″ strip in half to find the center.
Stitch one triangle to each side of the strip, matching the folds carefully.
Using a 6 1/2″ acrylic ruler and rotary cutter, trim the unit to a 5″ square, aligning the diagonal line on the ruler with the center strip.
Repeat this process until you have:
252 finished blocks
Consistency is key here. Take your time aligning the ruler and trimming accurately—this step ensures your quilt top will come together smoothly.
diagram
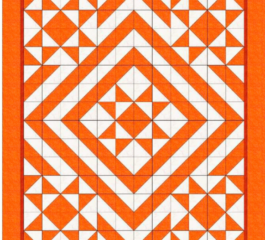
Quilt Top Assembly
Step 2 – Arrange and Sew the Rows
Arrange the blocks according to your preferred color distribution or follow the assembly layout.
Sew:
18 rows
14 blocks per row
Rotate the blocks as shown in the layout diagram to create the lattice effect.
Sew the rows together to complete the quilt top.
This stage is where the design truly comes to life, revealing the dynamic pattern created by the rotating blocks.
Quilting and Finishing
Step 3 – Layer and Finish the Quilt
Layer the quilt top, batting, and backing.
Baste securely using pins, spray, or your preferred method.
Quilt as desired.
Bind the edges using your prepared binding fabric.
You can choose simple straight-line quilting, diagonal stitching, or free-motion designs depending on your style and skill level.

diagram
Suggested Color Combinations
One of the joys of the Trading Patches quilt is experimenting with color. Here are a few combinations that work beautifully:
- Scrappy Rainbow: Use a wide range of bright prints for a cheerful look
- Farmhouse Neutrals: Cream, gray, and soft blues
- Vintage Charm: Floral prints in muted tones
- Modern Contrast: Black, white, and bold accent colors
- Seasonal Palette: Reds and greens for holiday quilts
These options make the pattern adaptable for any décor or occasion.
Tips for Success
- Use consistent seam allowances for accurate block sizing
- Press seams carefully to reduce bulk
- Lay out blocks before sewing to balance colors
- Trim blocks precisely for smooth assembly
- Chain-piece blocks to save time
These simple habits can make a big difference in the final result.
The Trading Patches Quilt Pattern is a delightful project that brings together creativity, color, and the joy of quilting. With its simple construction and eye-catching design, it’s a wonderful choice for quilters of all skill levels, whether you’re using cherished scraps or coordinating a fresh set of fabrics.