Black (Color C – for tail and embroidery)
Crochet hook: 3.5 mm (E/4)
Tapestry needle
Scissors
✨ Stitches Used (US Terminology)
🐾 Instructions
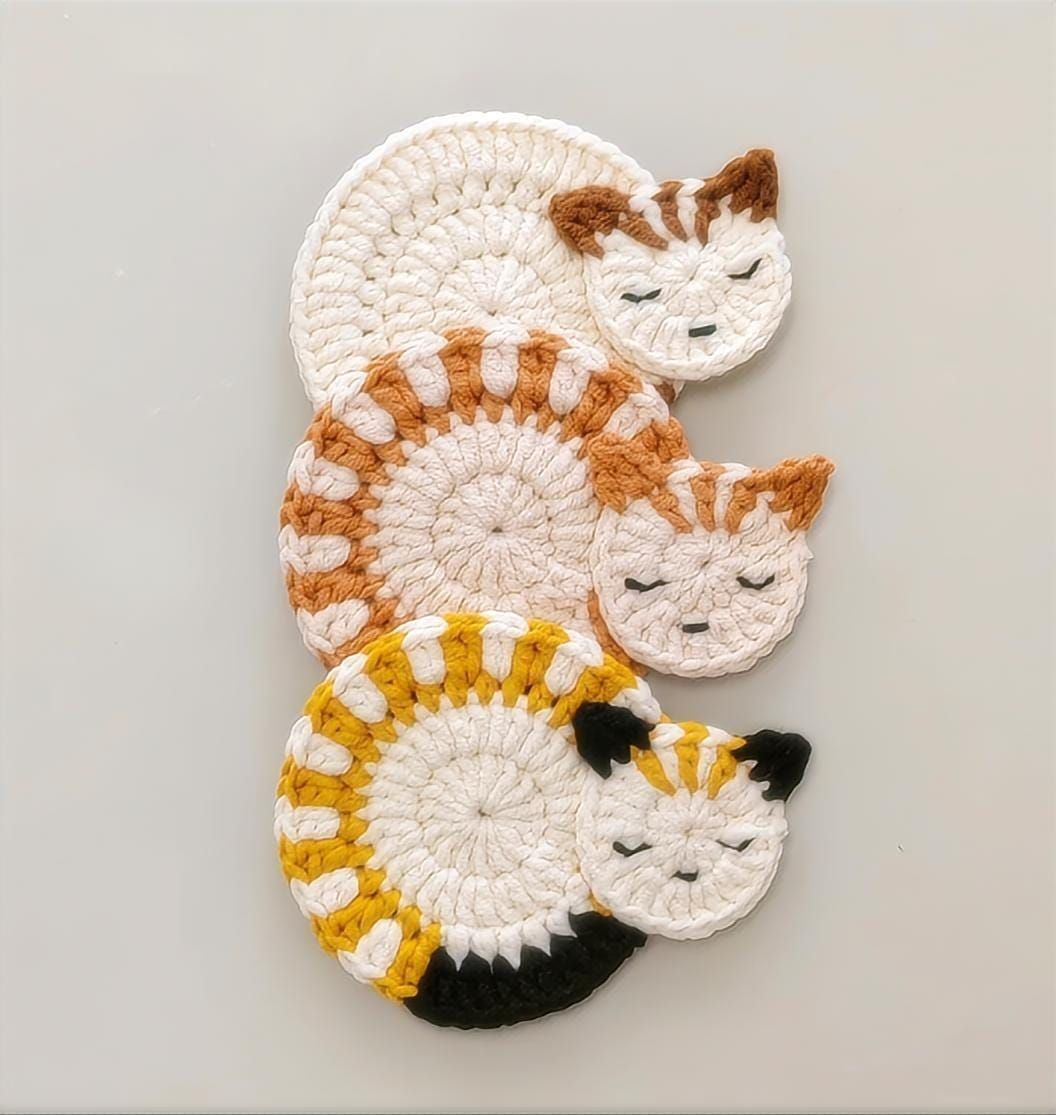
🐱 Body of the Kitten
With Color A (Ecru):
-
Start with a magic ring.
-
Ch 3 (counts as first dc), then make 15 dc into the ring.
– You’ll have 16 dc total.
-
Pull the ring closed and sl st to the top of the beginning ch-3.
-
Ch 3, make 1 dc in the same st. Then make 2 dc in each st around.
– You should have 32 dc.
-
Sl st to the third ch of beginning ch-3 and fasten off Color A.
Join Color B (Yellow):
-
Attach yarn and ch 2.
-
Work 1 sc in each stitch around (32 sc total).
-
Sl st to first sc and fasten off.
🐾 Stripes & Tail (Tapestry Crochet)
Now you’ll alternate between Color A and B to create 12 sections:
-
Join Color A and begin working dc stitches, carrying both yarns along (tapestry crochet technique).
-
For each section:
-
Work 2 dc in one stitch, then 1 dc in next, then start 1 dc but leave unfinished.
-
Change color before finishing that last dc.
-
Repeat for 12 segments, alternating colors to form a stripe pattern.
-
Once you finish 12 repeats, switch to Color C (Black) for the tail.
-
Work 6 dc pairs (12 stitches total) for the tail segment.
-
Sl st to join, fasten off, and weave in ends.
🐱 Head of the Kitten
With Color A:
-
Start with a magic ring, ch 2, then work 12 dc into the ring (13 dc total with chains).
-
Sl st to close the round.
-
Ch 3, make 1 dc in the same stitch, then 2 dc in each stitch around.
– Stop 3 stitches before the end.
Add Yellow Stripes on Head:
-
Begin tapestry crochet again, interchanging colors every stitch for 3 alternating yellow segments.
-
Finish with dc in Color A, sl st to join, and fasten off.
-
Weave in ends carefully.
🐱 Ears (With Color C)
Make 2 ears directly on the head using the black yarn:
-
Insert hook into designated stitch on top of head (see photo for placement),
-
Ch 3, work 2 dc (unfinished) into next two stitches, then pull through all loops on hook (cluster).
-
Ch 1 to secure and fasten off.
-
Repeat on the other side for the second ear.
🧵 Embroidery – Eyes and Nose
With fine black thread or embroidery floss:
-
Thread a tapestry needle and make small horizontal stitches for eyes.
-
Add a tiny nose or mouth if desired.
-
Secure knots on the back and weave in carefully.
🧵 Assembly
-
Place the head over the top of the body, positioning it just above the yellow band.
-
Sew the head onto the body using sewing thread or a matching yarn.
-
Be careful not to sew the ears down – they should stand out!
📏 Finished Measurements
🎨 Tips
-
Use any color combination for playful variations – calico, tabby, or even rainbow kittens!
-
These make lovely gifts or can be sold at craft fairs.
This project is beginner-friendly, quick to finish, and full of charm. Whether you’re making one for yourself or for a fellow cat-lover, these kitten coasters will surely bring a smile. Let your creativity shine through different color combos and expressions!