Crochet Rose Quilt Blanket Full Tutorial

Crocheting is a beautiful fusion of creativity and comfort, allowing crafters to transform simple yarn into stunning works of art. The Crochet Rose Quilt Blanket is a perfect example of this magic, where traditional granny squares meet modern pixel-style design. Inspired by cross-stitch patterns, this project brings a blooming rose to life using carefully placed crochet squares  each acting as a “pixel” in the overall image.

This pattern is ideal for crocheters who enjoy detailed, step-by-step projects with a visually rewarding outcome. By combining colors strategically and assembling the squares according to a chart, you’ll watch the rose slowly unfold across the blanket  petal by petal, leaf by leaf. It’s a creative and satisfying experience, whether you’re making it for yourself, as a gift, or even as a decorative throw for your home.

What makes this project truly unique is its versatility. You can customize the size by adjusting the number of squares, play with different color schemes, or even use the technique to create other images. Whether you’re an experienced crocheter or just getting started with granny squares, this pattern offers a rewarding challenge and a gorgeous end result.

Crochet Rose Quilt Blanket

🧶 Technique Used

This project is based on:

  • Simple granny squares — each square represents one “pixel” of the image.

  • The cross-stitch chart guides the placement of colors.

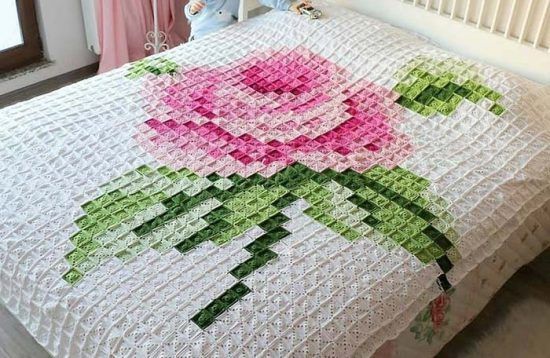
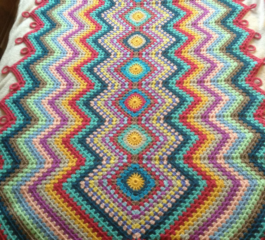
  • The final result forms a giant rose, like a pixelated crochet quilt!

  • ✂️ Materials Needed

    • Cotton or acrylic yarn in the following colors:

      • Light pink

      • Dark pink

      • Light green

      • Dark green

      • Black or dark green (for the stem and details)

      • White (main background)

    • Crochet hook suitable for your yarn (usually 3.5 mm to 4.5 mm)

    • Yarn needle

    • Scissors

    • Stitch markers (optional)

    📏 Final Size

    You can adjust the size based on the number of “pixels.”
    The image shows a rose spanning around 30 to 40 squares wide.

    Each granny square measures approximately 2″ x 2″ (5 x 5 cm).
    So, the final blanket may be about 60″ or more (1.5m), depending on your gauge and number of squares.

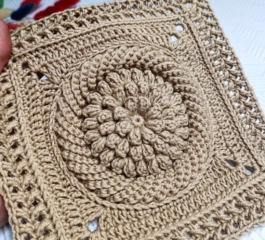
    🧵 How to Crochet the Basic Granny Square

    Use the chart shown in the image as a guide. Below is the written version:

    🧩 Basic Square Instructions:

    1. Make a magic ring or chain 4 and join with a slip stitch to form a ring.

    2. Round 1:

      • Ch 3 (counts as 1 dc), then 2 dc into the ring.

      • Ch 2 (corner), 3 dc into the ring — repeat 3 more times.

      • Join with a slip stitch to the top of the starting chain.
        (You should have 4 sets of 3 dc with ch-2 corners.)

    3. Round 2:

      • Slip stitch to the next corner space.

      • Ch 3, 2 dc, ch 2, 3 dc in the same corner (first corner made).

      • In the side space: 3 dc.

      • In next corner space: 3 dc, ch 2, 3 dc.

      • Repeat until the round is complete.

      • Join with slip stitch.

    You can stop at Round 2, as shown in the chart, to keep the squares small and neat.
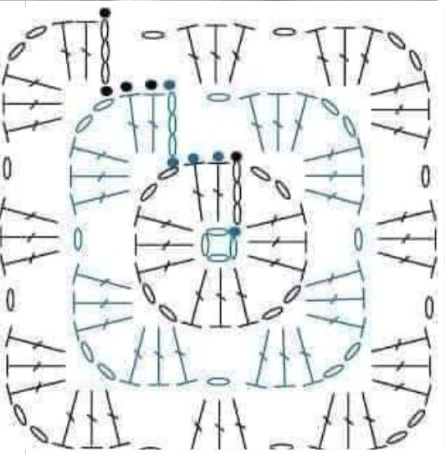
    Basic Granny Square

    🎨 Arranging the Rose (Color Chart)

    Use the cross-stitch chart in the image as your color guide:

    • Each square in the chart = 1 granny square.

    • Follow the colors exactly as in the diagram:

      • Dark pink = center of the rose

      • Light pink = outer petals

      • Dark and light green = leaves

      • Black or dark green = stem

      • White = background of the blanket

    You may want to print the chart and number the rows (row 1, row 2, etc.) to help with layout.
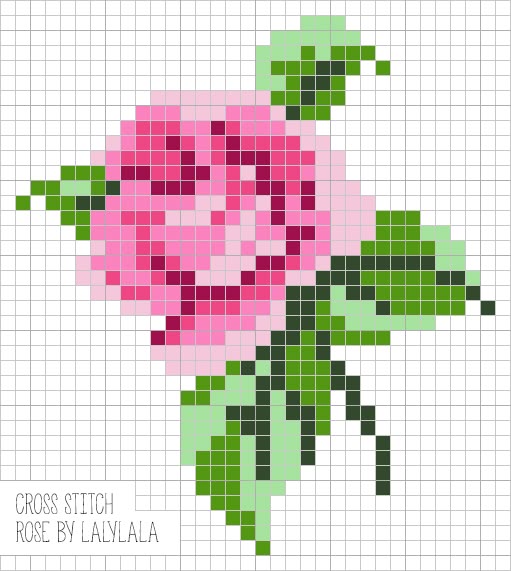
    layout.

    🧩 Final Assembly

    1. Make all the squares according to the color chart.

    2. Join the squares using:

      • Slip stitch (invisible seam)

      • Or sewing with a tapestry needle

      • Or single crochet through back loops only for a raised seam

    3. Finish with a border using single crochet or double crochet all around the blanket for a clean edge.

    ✅ Extra Tips

    • Make your squares in color batches (all white first, then pinks, then greens).

    • Use a flat surface or layout board to arrange the squares before joining.

    • Block your squares if needed to make them uniform in size.

    👉 Download Crochet Rose Quilt Tutorial PDF

    This blanket is a stunning, artistic project. Combining granny squares with a cross-stitch-style chart turns crochet into pixel art. You can use this same technique to create other designs — just follow the same process!

    You might also be interested

    Crocodile Shawl Pattern – Free Crochet Tutorial

    Crocodile Shawl Pattern – Free Crochet Tutorial

    If you’re looking for a crochet project that combines elegance, texture, and a little bit of...

    Chevron Bag Crochet Free Pattern

    Chevron Bag Crochet Free Pattern

    Looking for a beautiful yet beginner-friendly crochet project? The Chevron Bag Crochet Pattern is a...

    Incredible Flower Square Pattern for Afghan

    Incredible Flower Square Pattern for Afghan

    If you love adding floral elements to your crochet projects, the Incredible Flower Square Pattern is...

    Crochet Your Own Cute Custom Crocs – Full Tutorial

    Crochet Your Own Cute Custom Crocs – Full Tutorial

    Crocs have become a popular staple in wardrobes around the world known for their comfort,...

    You Are Here: