Crochet Your Own Cute Custom Crocs – Full Tutorial

Crocs have become a popular staple in wardrobes around the world known for their comfort, durability, and quirky style. But what if you could take your Crocs to the next level with a handmade crochet touch? In this tutorial, we’ll show you how to transform a basic pair of Crocs into something truly one-of-a-kind, blending function with fashion.

Whether you’re a beginner looking to try something new or an experienced crocheter seeking a fun project, this pattern is perfect for expressing your creativity. From the cozy inner lining to the decorative top cover and side band, every part of the Crocs can be personalized with color, texture, and embellishments. The result? A pair of shoes that’s warm, stylish, and totally custom.

What makes this project even better is how adaptable it is you can modify the size, change the stitch styles, or add flowers, beads, and buttons to match your personal aesthetic. It’s also a great way to upcycle an old pair of Crocs that needs a fresh look.

Crocs Crochet

In this detailed, step-by-step guide, you’ll learn how to crochet each component, join the pieces seamlessly, and add decorative details that will make your footwear stand out. Whether you wear them around the house or out with friends, your crochet Crocs will surely turn heads!

🧶 Materials Needed

  • Yarn: 8-ply Adoral Fiber yarn (soft and sturdy)

  • Hook: 3.5 mm crochet hook (4.0 mm optional, but gauge may vary)

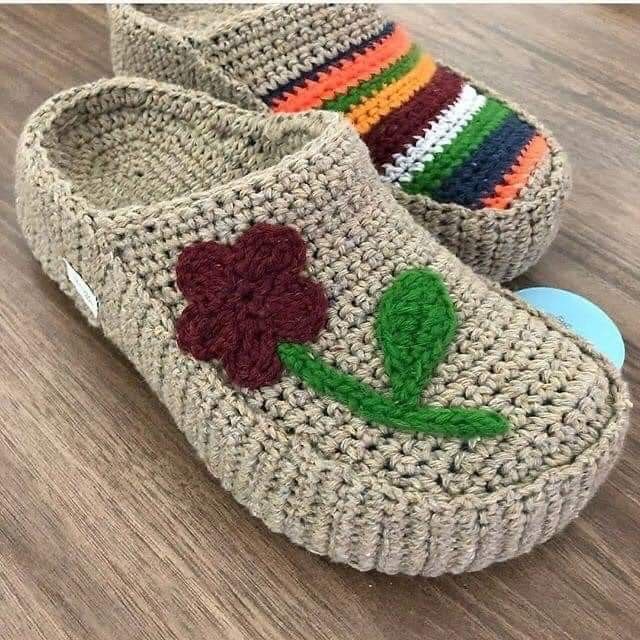
  • Crocs: An actual pair of Crocs (used as a base)

  • Scissors

  • Invisible thread (for sewing)

  • Yarn needle or large pin (to pierce Crocs)

  • Stitch markers

  • Decorations (optional): pearl beads, stickers, crochet sunflowers

  • 👣 Measuring the Base

    Use a pair of Crocs and measure from the bottom of the heel up to where the cover should end. The base sample here measures 6.5 inches (fits around size 43 EU, but easily adjustable).

    🪡 Crocheting the Inner Facing

    Step 1: Chain Base

    • Chain 36.

    Step 2: Toe Curve

    • In the third chain from the hook, work 5 half double crochets (hdc) into the same stitch.

    • Continue along the chain with 16 hdc, placing 1 hdc per chain.

    Step 3: Side Stitching

    • Mark the last hdc with a stitch marker.

    • Crochet 17 single crochets (sc).

    • In the last chain, make 6 sc in the same stitch to round the corner.

    Step 4: Work Back the Opposite Side

    • Work 16 sc back down the chain.

    • Mark the final sc with a stitch marker.

    Step 5: Complete Round

    • Continue with 16 hdc, then slip stitch into the first hdc to close the round.

    🧶 Inner Facing Increases

    Round 2:

    • Chain 2.

    • In the next few stitches, work 6 increases (2 hdc in each stitch).

    • Continue with 16 regular hdc, place a stitch marker at the end.

    Round 3:

    • Work 16 sc.

    • At the curved area, work 6 increases of sc to make 12 sc total.

    • Continue with 16 sc back to the marker.

    Round 4:

    • Work 16 hdc, slip stitch to join.

    📏 Building the Height

    Rows 5 to 7:

    • Work half double crochet in back loops only for texture.

    • Repeat this for 2–3 more rows or until you reach 7–8 total rounds.

    • Finish with a front loop-only row of hdc for a raised edge effect.

    🧵 Creating the Inner Top Cover

    Base:

    • Chain 7 (6 + 1 turning chain).

    • Row 1: Work 6 sc.

    Increasing Rows:

    • Rows 2–4: Increase 1 stitch at the beginning and end of each row.

    • You should reach 12 sc.

    Rows 5–7:

    • Work regular rows (no increase).

    Transition to hdc:

    • Row 8: Switch to hdc and increase at both ends.

    • Continue with 6 rows of hdc to build height.

    Final Row:

    • Work sc around all edges to clean up before attaching.

    🧷 Attaching the Inner Cover

    1. Use stitch markers to align the inner top to the base.

    2. Use whip stitch and a yarn needle or large pin to attach.

    3. Fit the piece into the Croc and sew it into place using invisible thread.

    🧶 Creating the Side Band (Elastic Effect)

    Band:

    • Chain 10.

    • Row 1: sc in each (9 sc).

    • Repeat rows using back loops only to create elastic texture.

    • Continue until you reach 65 rows or enough to wrap around the Croc’s side.

    Joining:

    • Use slip stitch to join both ends into a ring.

    • Attach it around the sides of the Crocs using stitch markers and then sew with invisible thread.

    🎀 Creating the Outer Top Cover

    Repeat the same steps as the inner top cover:

    • Start with 6 sc.

    • Increase in Rows 2–4.

    • Add 3 regular rows.

    • Increase again in Row 8 to reach 14 sc.

    • Work up to 24 rows total.

    • Crochet flaps on both sides and decrease to shape them.

    Finish by cleaning up edges with sc and attach the top securely using stitch markers and whip stitch.

    ✨ Decoration Tips

    • Add stickers or pearl beads to personalize.

    • Crochet flowers (like sunflowers) to embellish the top.

    • Use invisible thread to sew decorations without visible stitches.

    ✅ Final Tips

    • Test fit each piece before sewing.

    • Use a strong needle that can pierce through Crocs.

    • Take your time sewing to ensure durability.

    • Adjust starting chain count for different Crocs sizes.

    📄 Download Crochet Custom Crocs Tutorial PDF

    Congratulations! You’ve now created a fully customized pair of crochet-covered Crocs. This fun and fashionable project lets you mix comfort and creativity, making your Crocs truly one-of-a-kind. Whether you use bright colors, elegant neutrals, or whimsical stickers—your shoes will be uniquely you.

    Happy crocheting! 💖

    You might also be interested

    Binding Tool Star Quilt Pattern

    Binding Tool Star Quilt Pattern

    If you’re looking for a bold and elegant quilt that highlights precision, symmetry, and clever...

    Standing Strong Quilt Free Pattern

    Standing Strong Quilt Free Pattern

    There’s something deeply inspiring about a quilt that not only provides warmth but also carries a...

    Triangle Log Cabin – The Twisted Log Cabin Quilt Pattern

    Triangle Log Cabin – The Twisted Log Cabin Quilt Pattern

    The classic Log Cabin quilt block is a beloved symbol of warmth, history, and home. But what happens...

    Woven Dimensional Quilt Pattern

    Woven Dimensional Quilt Pattern

    Looking for a quilt pattern that stands out with a bold, contemporary feel? The Woven Dimensional...

    You Are Here: