Project Details
| Detail |
Information from the pattern |
| Pattern name |
Mama Lal |
| Designer |
Karen L. Miller of Redbird Quilt Co. |
| Featured fabrics |
Lal the Lamb by Susybee |
| Size listed on the cover |
38½ × 44 inches, approximately 98 × 112 cm |
| Color options |
Version A and Version B |
| Main techniques |
Panel cutting, straight piecing, framed corner blocks, borders, and folded flanges |
| General seam allowance |
¼ inch, unless otherwise specified |
The PDF does not assign a skill level. Familiarity with accurate cutting, a consistent seam allowance, and pressing will be useful. If folded flanges are new to you, try a short practice strip on scrap fabric before adding one to the quilt.
Choose Between Version A and Version B
Both versions use the same pink quilt panel and white double-border fabric. The differences are in the supporting prints: the flange, corner-block frames, center-panel border, and binding.
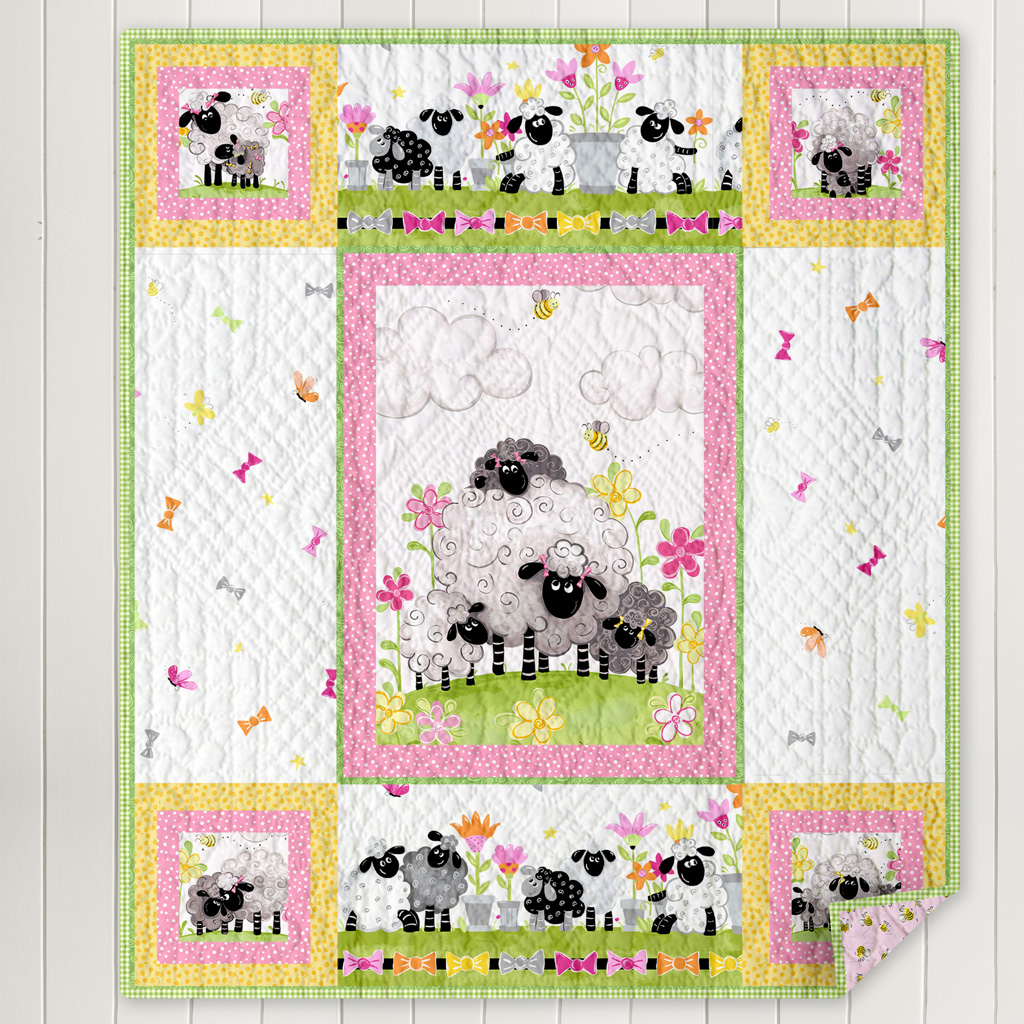
Version A combines a green flange, green gingham binding, yellow outer corner-block frames, and pink inner frames. Version B uses a pink flange, yellow gingham binding, pink outer corner-block frames, and soft green inner frames.
The side-by-side fabric lists on page 2 of the PDF make it easy to follow your preferred version. Choose one before cutting, then label your fabric stacks by their role. This helps prevent confusion when a color used for one part in Version A appears in a different part in Version B.
Fabric Requirements
The quantities below follow the supplied pattern. Each row gives the amount needed for the version you choose.
| Placement |
Version A |
Version B |
Quantity |
| Main panel and corner motifs |
Pink Quilt Panel, SB20300-520 |
Pink Quilt Panel, SB20300-520 |
1 yard |
| Flanges |
Medium Green Swirls Basic, SB20103-830 |
Pink Irregular Dot Basic, SB20171-520 |
½ yard |
| Binding |
Green Gingham Check Basic, SB20268-820 |
Yellow Gingham Check Basic, SB20268-310 |
¼ yard |
| Outer corner-block frames |
Yellow Tonal Dot Basic, SB20157-310 |
Pink Susy Bees Basic, SB20197-520 |
⅜ yard |
| Center-panel border and inner corner-block frames |
Pink Irregular Dot Basic, SB20171-520 |
Soft Green Sunburst Dot Basic, SB20104-835 |
⅜ yard |
| Large borders |
White Double Border, SB20403-100 |
White Double Border, SB20403-100 |
⅞ yard |
| Suggested backing |
Pink Susy Bees Basic, SB20197-520 |
Medium Green Sheep Meadow, SB20049-830 |
1½ yards |
The pattern also lists 40 × 50 inches of batting. Gather your rotary cutter, cutting mat, quilting ruler, pins or clips, coordinating thread, and pressing tools before you begin.
If you are substituting fabrics, check the usable panel dimensions and the placement of the printed motifs. A different panel or border repeat may require revised cuts and additional fabric. Compare it with the cutting diagram before using the original yardage as your shopping list.
Measurements and Terms to Know
The PDF uses WOF for width of fabric, from selvage to selvage, and LOF for length of fabric, parallel to the selvage. These directions are especially important when cutting the printed border fabric.
| Component |
Preparation measurement |
| Center panel |
Square to 15½ × 21½ inches |
| Four corner motifs |
Square each to 5½ × 5½ inches |
| Framed corner units |
Trim each assembled unit to 10 × 10 inches before joining |
| Flange strips |
Cut 1 inch wide, then press in half lengthwise |
These are preparation measurements, not interchangeable finished dimensions. Keep the full cutting list beside your cutting mat, and follow the PDF for all remaining strip widths and lengths.
Preparing the Panel and Directional Prints
Start by pressing the fabric and examining the printed design. Before trimming the central panel, check where the ruler falls around the illustration so that the sheep and surrounding details sit comfortably inside the cut edges.
Cutting the corner motifs deserves the same care. Position each one deliberately rather than using the first available square of fabric. Lay the four trimmed motifs together and check that they feel visually balanced before adding their frames.
The border-cutting diagram on page 3 of the PDF shows how the sheep bands and the remaining center portion of the double-border fabric are used. Follow that layout carefully. Directional prints can look very different when rotated, so place all four border pieces around the center panel before sewing.
Assembly Overview
Use this overview to understand the sequence, then follow the PDF’s diagrams and measurements as you work.
- Frame the four corner motifs. Add the first border to the sides, then the top and bottom. Repeat with the second border fabric.
- Trim the corner units. The pattern deliberately makes them oversized; square each completed unit to 10 × 10 inches.
- Build the top and bottom sections. Join the framed corner units to the ends of the appropriate printed border pieces.
- Border the center panel. Attach the side pieces first, followed by the top and bottom pieces.
- Add the inner flange. Press the flange strips in half and attach them around the bordered center using the specified ⅛-inch seam.
- Join the larger sections. Add the side borders, then attach the completed top and bottom sections.
- Add the outer flange. Follow the pattern’s placement instructions around the outside of the quilt top.
- Quilt and bind. Finish with your preferred method, or use the binding tutorial linked in the PDF.
Pages 4 and 5 of the PDF illustrate these stages. Looking ahead at those diagrams before sewing makes it easier to understand where each framed block and folded accent belongs.
Tips for Accurate Borders and Flanges
A consistent seam allowance helps the framed corner blocks and the center section meet neatly. Check your machine setup on scrap fabric, particularly if you have recently changed your presser foot or needle position.
Press each addition before measuring the next stage. Lift and lower the iron rather than sliding it along the fabric, especially around narrow strips. Keeping the pieces flat makes it easier to see whether a seam is straight and whether the corners remain square.
For the flanges, take time to press an even fold along the strip. Align the raw edges carefully as shown in the pattern, and keep the folded edge free. Check the position before attaching the neighboring section so that the accent remains visible as intended.
It is also helpful to photograph the arranged quilt top before joining the larger pieces. You can refer to the picture if a border gets turned around while moving between your layout surface, sewing machine, and ironing board.
Quilting Ideas for the Finished Top
Choose quilting that supports the printed artwork. Gentle curves or softly spaced lines can add texture while allowing the sheep illustrations to remain the focal point. For a more detailed finish, you might use different quilting in the corner frames and the larger background areas.
Make your stitching plan with the batting manufacturer’s recommended quilting distance in mind. Test your thread color on a scrap of the light background and a scrap of a darker print to see how strongly it shows.
Download the free Mama Lal Quilt Pattern PDF below for the complete fabric requirements, cutting measurements, and illustrated assembly instructions.
Before preparing the quilt sandwich, measure the assembled top and confirm that the backing and batting provide enough working space for your chosen quilting method. The finished piecing is the most useful reference at this stage.
Mama Lal Quilt Pattern: Sweet Lamb Quilt with Free PDF
The Mama Lal Quilt Pattern offers a cheerful way to turn an illustrated panel into a thoughtfully framed quilt. Its combination of sheep motifs, colorful corner blocks, and narrow folded accents gives you several satisfying details to work on without losing the charm of the original fabric artwork.
Choose your favorite color version, organize your fabric pieces, and enjoy watching the design come together one section at a time.