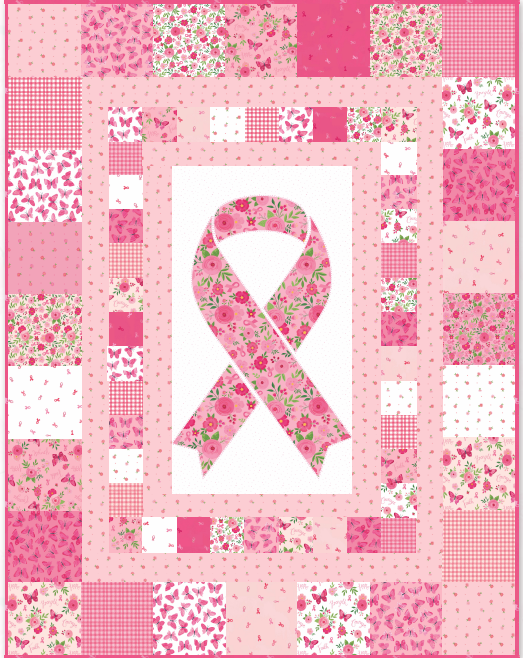
There is something deeply meaningful about quilting when it carries a message beyond fabric and thread. The Strength In Pink Hope Quilt Pattern is more than a beautiful design it’s a tribute, a symbol of resilience, and a heartfelt expression of support for those affected by breast cancer. Whether you’re creating this quilt for yourself, as a gift, or as part of a charity project, every stitch becomes a quiet message of hope and strength.
Strength In Pink Hope Free Quilt Pattern
The “Strength In Pink” theme draws inspiration from the global movement for breast cancer awareness. Quilts like this are often made for fundraisers, hospital donations, or simply to wrap a loved one in comfort during difficult times. The intentional use of pink tones from pale pastels to bold fuchsias creates visual depth while reinforcing the message of hope.
Strength In Pink Hope Free Quilt Pattern
What makes this pattern especially appealing is its versatility. You can choose a modern layout with clean geometric lines or a more traditional arrangement using classic quilt blocks. Some quilters incorporate appliqué ribbons, while others prefer pieced designs that subtly form the awareness symbol through color placement. This flexibility allows you to personalize your quilt, making it truly one-of-a-kind.
Fabric Selection and Color Harmony
Choosing the right fabrics is one of the most enjoyable parts of this project. Since the theme revolves around pink, you’ll want to explore a wide range of shades to create contrast and interest.
Consider combining:
- Light pinks and blush tones for background areas
- Medium rose shades for balance
- Deep magenta or fuchsia for focal points
- White or cream to add brightness and contrast
Mixing prints—such as florals, polka dots, and subtle geometrics adds texture without overwhelming the design. If you prefer a more modern look, stick with solids or tone-on-tone fabrics for a clean, cohesive finish.
Materials and Preparation
Before you begin, gather your materials and prepare your workspace. Organization is key to enjoying the quilting process.
Basic Materials:
- Assorted pink fabrics (variety of shades)
- Background fabric (white, cream, or light neutral)
- Rotary cutter and cutting mat
- Quilting ruler
- Sewing machine
- Coordinating thread
- Batting (cotton or cotton blend recommended)
- Backing fabric
- Pins or clips
Preparation Tips:
- Pre-wash your fabrics to prevent color bleeding
- Press all fabrics before cutting
- Use a consistent seam allowance (¼ inch is standard)
- Label your pieces if working with multiple shades
Taking the time to prepare properly will ensure a smoother and more enjoyable quilting experience.
Cutting and Piecing the Blocks
The Strength In Pink quilt typically uses repeated blocks that come together to form a cohesive layout. Depending on your chosen design, these may include half-square triangles, squares, or strip piecing techniques.
General Piecing Steps:
- Cut all fabric pieces according to your chosen block size
- Arrange your pieces before sewing to visualize the layout
- Sew units together in rows or sections
- Press seams carefully (pressing direction matters for nesting seams)
- Join rows to complete each block
If your design includes symbolic shapes like ribbons, pay close attention to placement and orientation. Precision in cutting and sewing will make the final design stand out beautifully.
Assembling the Quilt Top
Once your blocks are complete, it’s time to assemble the quilt top. Lay out all your blocks on a flat surface or design wall to ensure the color distribution feels balanced.
This is your opportunity to make adjustments—swap blocks, rotate them, or rearrange colors until the overall look feels just right. A well-balanced layout enhances the emotional impact of the quilt.
Sew the blocks together row by row, then join the rows to complete the quilt top. Press seams flat to reduce bulk and keep everything neat.
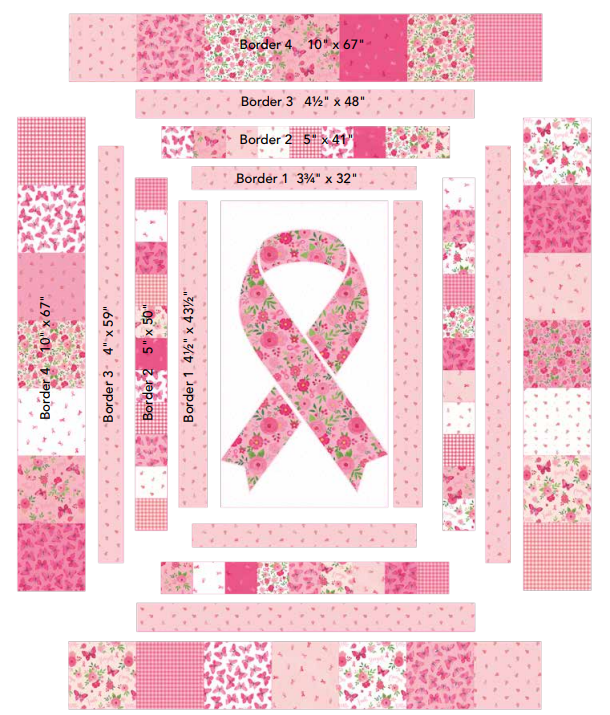
Diagram
Creative Variations and Personal Touches
One of the most beautiful aspects of this quilt is how easily it can be personalized. Here are a few ideas to make your version unique:
- Add embroidered names or messages
- Incorporate memory fabrics from loved ones
- Use appliqué techniques for ribbons or hearts
- Experiment with ombré layouts for a gradient effect
You can also adjust the quilt size—from a small lap quilt to a full bedspread—depending on your needs.
A Quilt with Purpose
The Strength In Pink Hope Quilt Pattern is more than a creative project—it’s a meaningful gesture. Many quilters choose to donate quilts like this to hospitals, cancer support centers, or charity organizations. Others gift them to friends and family members as a symbol of love and encouragement.
Every stitch becomes part of something bigger a reminder that even in difficult times, there is beauty, strength, and hope.
Strength In Pink Hope Quilt PDF
Creating the Strength In Pink Hope Quilt is a deeply rewarding experience, both artistically and emotionally. It allows you to combine your passion for quilting with a powerful message that resonates far beyond the finished piece.
Take your time with each step, enjoy the process, and let your creativity guide you. Whether you keep it, gift it, or donate it, this quilt will carry warmth, compassion, and meaning wherever it goes.
You might also be interested
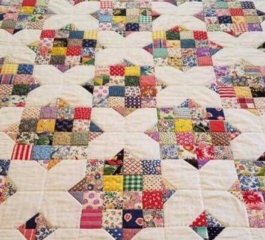
Scrappy Crossroads Quilt Free Pattern
If you enjoy turning leftover fabric into something beautiful, the Scrappy Crossroads Quilt is a...

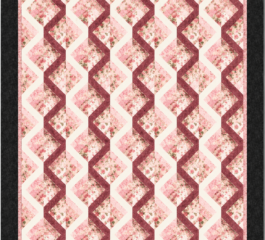
Single Scoop Quilt Pattern
There’s something timeless about quilts that combine simple shapes with bold color placement, and...
Pearl Luxe Quilt Pattern
There are quilt patterns that immediately capture attention, and the Pearl Luxe Quilt is certainly...
Geese Migration Quilt Pattern
The Geese Migration Quilt Pattern is a beautiful design inspired by the natural rhythm of birds...
You Are Here: