Block Size
The pattern is designed to create approximately a:
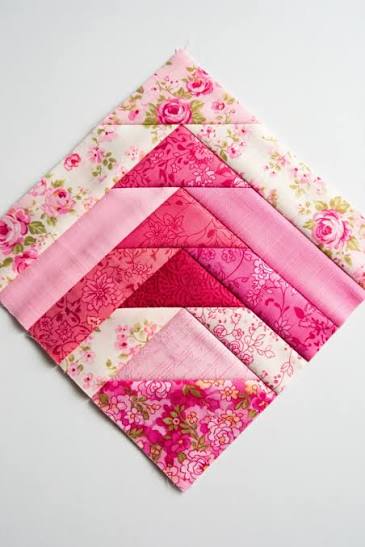
12-inch finished quilt block
Individual pieces are cut slightly larger to allow for seam allowances during construction.
Skill Level
Confident Beginner to Intermediate
The main skills used in this project include:
- Accurate rotary cutting
- Basic patchwork piecing
- ¼-inch seam allowance
- Stitch-and-flip corners
- Pressing seams carefully
Materials
One of the nicest things about this pattern is that you do not need a large amount of fabric.
You can use:
- Assorted quilting cotton
- Scraps from previous projects
- Low-volume prints
- Solid fabrics
- Floral fabrics
- Coordinated fat quarters
For the angled sections, choose fabrics with enough contrast so that the geometric shapes remain visible.
Cutting Instructions
For one Chicago Geese Quilt Block, cut the following pieces:
A – Cut 1 rectangle:
2½” × 12½”
B – Cut 2 rectangles:
2½” × 10½”
C – Cut 2 rectangles:
2½” × 8½”
D – Cut 2 rectangles:
2½” × 6½”
E – Cut 1 rectangle:
2½” × 4½”
You will also need:
F – Cut 5 squares:
4½” × 4½”
The different lengths of the rectangular pieces are what create the stepped appearance of the block.
How to Make the Chicago Geese Quilt Block
Step 1 – Make the First Unit
Begin with:
- 1 D rectangle
- 1 E rectangle
- 1 F square
Arrange the pieces according to the pattern diagram.
Sew the pieces together using an accurate ¼-inch seam allowance.
Press the seams toward the D and E rectangles.
Taking time to press carefully during each stage will help keep the final block flat and square.
Step 2 – Create the Angled Corner
Place another F square on the unit.
Use the stitch-and-flip technique to create the diagonal section.
Draw a diagonal line from corner to corner on the wrong side of the square if needed.
Sew directly along the marked line.
Trim away the excess fabric, leaving approximately a ¼-inch seam allowance.
Flip the triangle outward and press it toward the corner.
This creates the first flying-geese-style section of the block.
Step 3 – Add the C Rectangle
Next, use:
Repeat the same general construction method used in Steps 1 and 2.
Make sure the direction of the diagonal matches the diagram before stitching.
Because the block relies heavily on directional placement, checking the orientation before sewing can save a lot of seam ripping later.
Step 4 – Add the B Rectangle
Continue building the block by adding the B rectangle and another F square.
Again, repeat the stitch-and-flip technique.
As the unit grows, you will begin to see the characteristic stepped Chicago Geese shape forming.
Press after each addition.
Step 5 – Complete the Block
Finally, add:
- A rectangle
- Remaining F square
Repeat the previous steps to complete the outer section of the block.
Once all pieces are assembled, press the entire block carefully.
Square the block if necessary, taking care not to cut off any important points.
Understanding the Stitch-and-Flip Method
If you are new to quilting, stitch-and-flip is a very useful technique to learn.
Place a square right sides together with the rectangle underneath it. Draw a diagonal guideline across the square.
Sew along the line, trim the excess corner fabric approximately ¼ inch beyond the seam, and then flip the remaining triangle outward.
Press it flat.
This technique produces clean diagonal shapes without requiring you to work with individual bias-edge triangles.
Fabric Ideas
The Chicago Geese Quilt Block changes dramatically depending on the fabrics you choose.
For a scrappy quilt, use a different fabric for each F square while keeping the rectangular strips in light neutral prints.
For a modern quilt, try white, cream, gray, or black backgrounds with bright solid colors.
For a traditional quilt, use small florals, reproduction fabrics, plaids, and warm neutral colors.
You could also create a dramatic version using deep navy, burgundy, emerald, or royal blue combined with cream backgrounds.
Turning the Blocks Into a Quilt
One Chicago Geese block is attractive on its own, but the design becomes even more interesting when multiple blocks are joined together.
Try rotating alternate blocks by 90 degrees before sewing the rows together.
Different rotations can create:
- Star-like secondary designs
- Pinwheel effects
- Geometric borders
- Interlocking flying-geese patterns
- Large medallion-style arrangements
Before joining your blocks, place them on a design wall or floor and experiment with several layouts.
You may discover an arrangement completely different from the original pattern.
Scrappy Chicago Geese Quilt
This pattern is especially suitable for using leftover fabric.
Because several of the pieces are relatively small, you can pull colors from your scrap basket rather than purchasing entirely new fabric.
A coordinated scrappy palette can look particularly beautiful. Try choosing scraps from one general color family and combining them with a consistent background fabric.
For example, you could use shades of blue, aqua, teal, and navy against a cream background.
Tips for Better Results
Accurate cutting is important because the rectangular pieces gradually change in length.
Use a quilting ruler and rotary cutter whenever possible.
Maintain a consistent ¼-inch seam allowance throughout construction.
Press instead of stretching the fabric with the iron.
When making stitch-and-flip corners, always check that the square is positioned correctly before trimming away the excess fabric.
Finally, measure the completed block before joining it to other blocks.
Small adjustments are much easier to make before assembling the entire quilt top.
Free Chicago Geese Quilt Block PDF
To make the project easier, I prepared a free printable Chicago Geese Quilt Block PDF with the cutting measurements, diagrams, and assembly instructions.
You can save the PDF to your computer or print it and keep it beside your sewing machine while working.
Download the free Chicago Geese Quilt Block PDF below and enjoy making your own version of this beautiful block.
Chicago Geese Quilt Block Pattern
The Chicago Geese Quilt Block has the perfect balance between simple construction and impressive visual results. Each individual step is manageable, yet the finished block creates movement and complexity.
It is also very versatile. You can make a single block for a pillow or table topper, create several for a runner, or repeat the design to make an entire bed quilt.
And because every fabric combination produces a slightly different effect, this is the kind of pattern you can return to again and again.