Materials to Gather
These amounts follow the accompanying PDF and include allowances for cutting waste and fabric variety. You can substitute suitable scraps for the listed fat quarters.
| Material |
Suggested amount |
| Light background fabric |
3½ yards |
| Assorted fabrics for pieced strips and border bars |
12 fat quarters |
| Flower and flower-center fabrics |
6 fat quarters |
| Green fabrics for leaves |
4 fat quarters |
| Blue inner-border fabric |
⅜ yard |
| Dark stem fabric |
⅜ yard, or 8 yards of prepared ¼-inch-wide bias |
| Binding fabric |
¾ yard |
| Backing |
5 yards of regular-width fabric, or 2½ yards of 108-inch-wide fabric |
| Batting |
At least 74 × 85 inches |
You will also need a rotary cutter, cutting mat, ruler, iron, removable marking tool, matching appliqué thread, and basting supplies. For the fusible method described in the PDF, use lightweight fusible web intended for sewing.
Terms used: WOF means width of fabric, excluding selvages. An unfinished measurement includes the seam allowances needed to join a unit. Use a consistent ¼-inch seam allowance for the patchwork unless otherwise stated.
Choosing Colors for the Flowers and Leaves
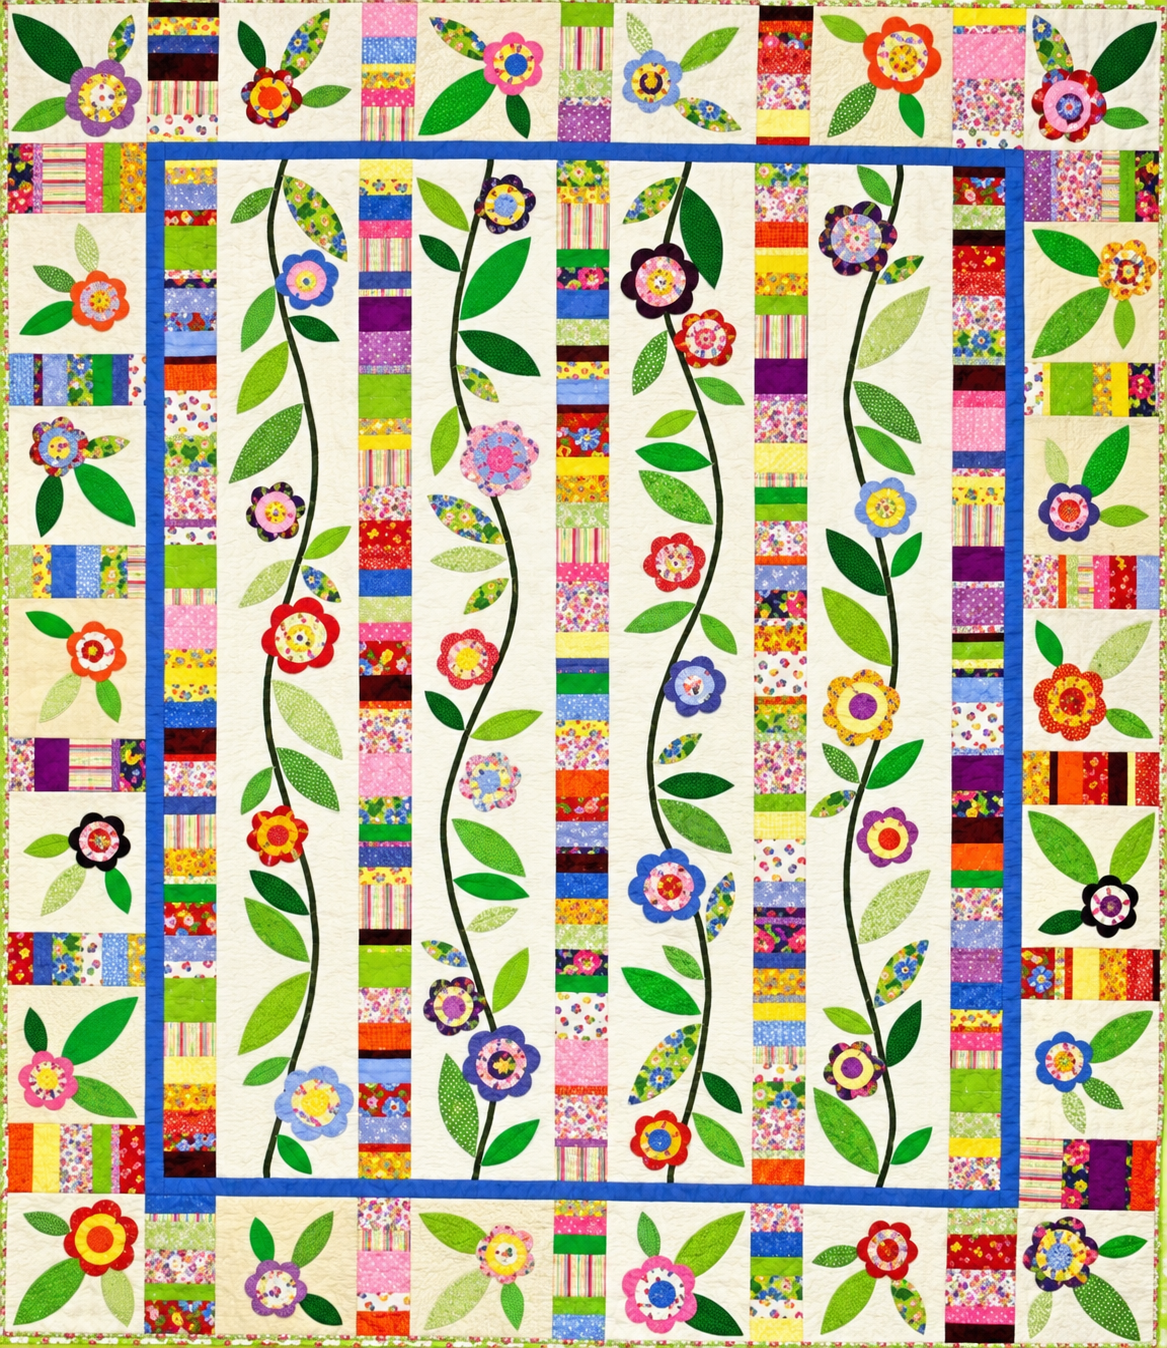
Start with the background, then choose a few colors to repeat throughout the quilt. Warm white or cream makes a gentle setting for pink, yellow, orange, purple, and blue flowers. Repeating those colors in the narrow patchwork strips helps connect the appliqué panels to their surroundings.
For the leaves, combine light, medium, and dark greens so that neighboring shapes remain distinct. Small-scale prints work especially well in the flower centers, where only a little fabric will show. Before fusing anything, arrange several complete flowers on the background and check that the petal layer, middle circle, and center circle are easy to distinguish.
How to Assemble the Quilt
1. Prepare the Appliqué Backgrounds
Begin with four background rectangles measuring 9 × 60 inches and twenty-two 9-inch squares. These pieces are deliberately oversized. Mark the center of each background and align it with the appropriate placement guide before adding the appliqué.
Print the templates at 100% or Actual Size. Measure the calibration square before tracing, then join the numbered panel sheets along their matching lines. Printer settings that shrink a page will also shrink the appliqué arrangement.
2. Make the Floral Panels
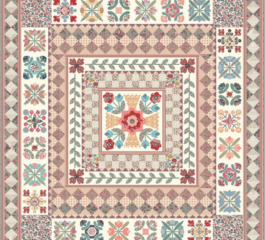
The center uses two copies of Panel P1 and two copies of Panel P2. Position and stitch the prepared bias stems first, following the curves in the guides. Add the leaves, then the flower layers, allowing the petals to cover the short stem ends and overlapping leaf bases where shown.
Once the appliqué is complete, press gently and trim each panel to 8½ × 58½ inches. Working one panel at a time makes it easier to keep track of the pieces and maintain a consistent stitching style.
3. Piece the Scrappy Strips
Sew the small rectangles into the measured modules shown in the PDF. Four modules join to form each long strip, and you will need five strips measuring 3½ × 58½ inches unfinished.
Vary the fabrics while keeping the prescribed patch heights. This creates a lively scrappy effect while preserving the length needed to match the floral panels. Press without pulling on the long edges.
4. Join the Center and Blue Frame
Alternate the five patchwork strips with the four appliqué panels. From left to right, the panel order is P1, P2, P2 rotated 180 degrees, and P1 rotated 180 degrees. The two right-hand panels are turned upside down during layout.
After joining the columns, the center should measure 47½ × 58½ inches unfinished. Add the blue top and bottom borders first, followed by the blue side borders, following the cutting chart in the PDF.
5. Assemble the Floral Outer Borders
Make twenty-two flower blocks and trim them to 8½ inches square. Each block uses one medium flower, its two center circles, and three leaves.
The border also uses narrow and wide patchwork bars. Keep these clearly labeled: their different widths account for the blue frame and allow the borders to fit. Assemble and attach the top and bottom outer borders before adding the sides. The corner flowers are already included in the side-border sequences.
6. Quilt and Bind
Check that every appliqué edge is secured, then layer the top with batting and backing. Quilting around the flowers and leaves can emphasize their outlines, while gentle background stitching adds texture to the open areas. Follow the batting manufacturer’s guidance for quilting distance.
Finish with the binding prepared from 2½-inch-wide strips. A fabric that repeats a color from the flowers or inner frame can give the outer edge a coordinated finish.
A Few Details That Help
Make a spare flower block and one patchwork module before preparing all the pieces. This gives you a useful opportunity to check your seam allowance, pressing method, and appliqué stitching. The reconstruction has been checked digitally but has not been test sewn.
The printed appliqué outlines do not include a turn-under allowance. For raw-edge fusible appliqué, cut on the outlines. If you prefer hand appliqué, use those outlines as turning lines and add your chosen allowance when cutting the fabric, as explained in the PDF.
Download the Free Illustrated PDF
With its flowing vines and repeating floral border, this quilt offers plenty of room to make thoughtful fabric choices. Keep the construction measurements consistent, then let the colors and prints give your version its own character.
The 35-page Flowering Vines reconstruction PDF includes material estimates, cutting tables, complete assembly diagrams, flower and leaf masters, and numbered full-size placement guides for the panels and border blocks.
Flowering Vines Quilt Pattern PDF Guide
The flower centers offer an opportunity to feature favorite details from your fabrics. A tiny blossom, a cluster of dots, or a small illustrated motif can become the focal point of an individual flower. Try placing a paper window over the fabric to preview what will appear inside the finished circle. Check the arrangement with the surrounding flower layers before cutting, so the chosen detail remains visible.
A label on the back can preserve the story behind the finished quilt. Include the project name, design credit, completion date, and a short note about its intended recipient or the fabrics you selected. If the patchwork contains scraps from earlier sewing projects, recording those connections adds meaning to the finished piece. These details can make a colorful quilt feel even more personal when it is given as a gift.