Crochet Instructions
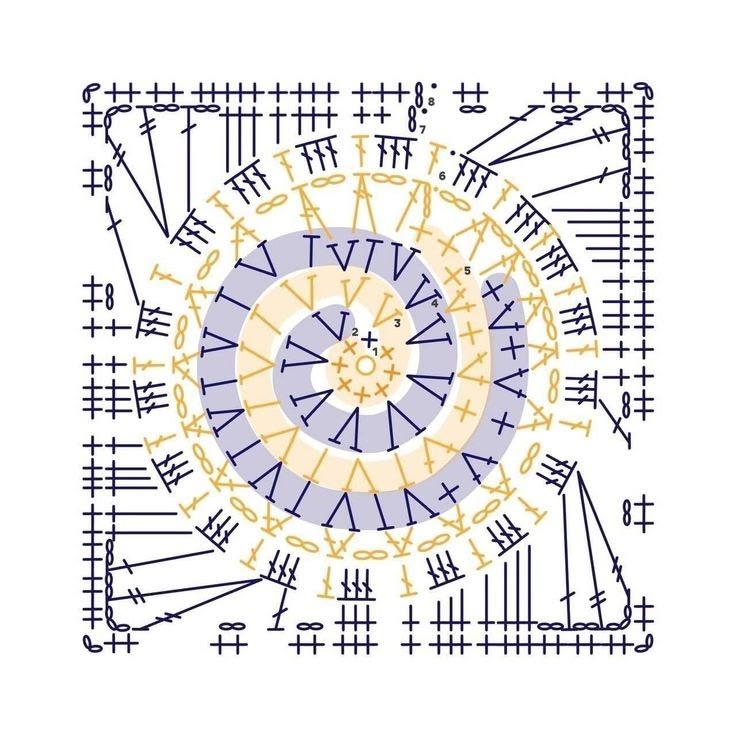
Round 1 – Center
With your center color, make a Magic Ring.
Ch 1.
Work 12 sc into the ring.
Pull the ring closed.
Join with a sl st to the first sc.
Stitch count: 12 sc
Fasten off if changing colors.
Round 2
Join your second color in any stitch.
Ch 3. This counts as the first dc.
Work 1 dc in the same stitch.
Ch 1.
Continue around:
2 dc in next st, ch 1.
Repeat around until you have worked into all 12 stitches.
Join with a sl st to the top of the beginning ch-3.
You should now have 12 groups of 2 dc separated by ch-1 spaces.
Round 3
Join the next color in any ch-1 space.
Ch 1.
In the same space work:
sc, ch 2, sc.
Repeat:
(sc, ch 2, sc) in each ch-1 space around.
Join with a sl st to the first sc.
You will have 12 small chain arches.
Round 4 – Building the Spiral Texture
Join your contrasting color in any ch-2 space.
Ch 3.
Work:
2 dc in the same ch-2 space, ch 1.
In each remaining ch-2 space work:
3 dc, ch 1.
Repeat around.
Join to the beginning ch-3.
You should have:
12 groups of 3 dc.
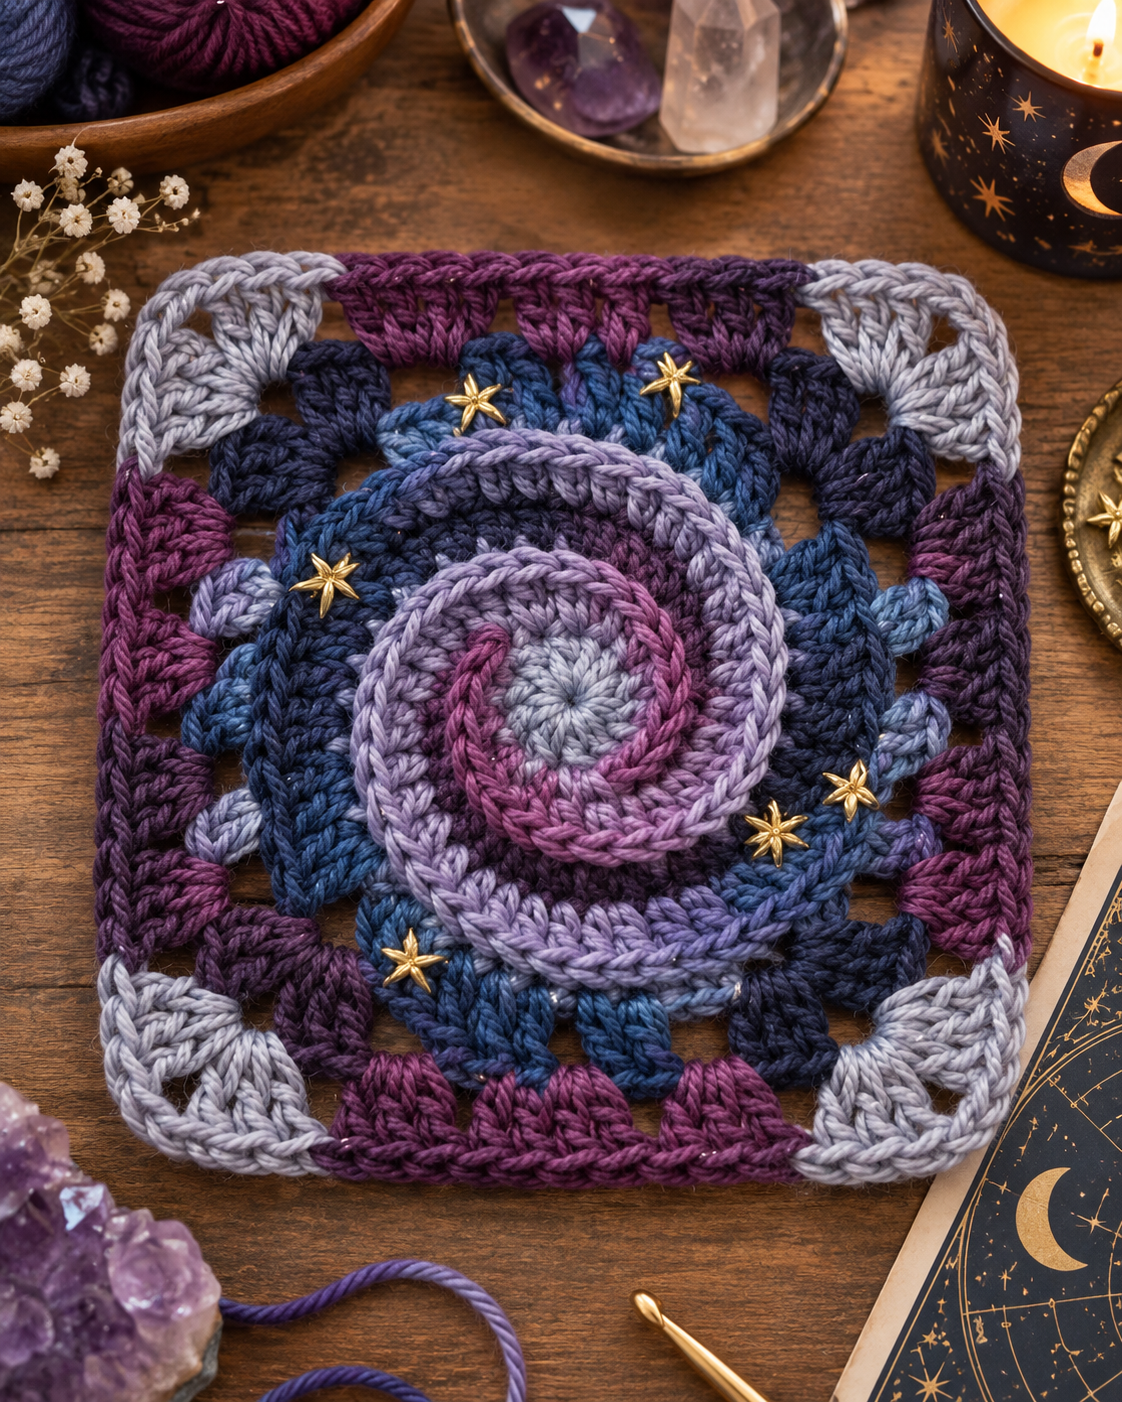
These clustered stitches begin creating the strong circular effect visible in the center of the square.
Round 5 – V-Shell Round
Join your next color in any ch-1 space.
Ch 3.
Work:
1 dc, ch 1, 2 dc
in the same space.
This forms the first V-Shell.
In every remaining ch-1 space work:
(2 dc, ch 1, 2 dc).
Join with a sl st.
You should have:
12 V-Shells.
At this stage the motif should still appear round.
Round 6 – Decorative Transition Round
Join the lighter contrast color in any V-Shell ch-1 space.
Ch 3.
Work:
2 dc, ch 1
in the same space.
In every remaining V-Shell space work:
3 dc, ch 1.
Repeat around.
Join to the beginning ch-3.
You should have 12 groups around the circle.
These 12 sections are important because they will be divided into four groups of three when the circular motif becomes a square.
Round 7 – Turning the Circle into a Square
This is the most important round.
Choose one ch-1 space as your first corner.
Join the darker yarn.
In the first ch-1 space work:
ch 4, 3 tr, ch 3, 4 tr.
This creates the first corner.
Side
In the next ch-1 space:
3 dc.
In the following ch-1 space:
3 dc.
Next Corner
In the next ch-1 space work:
4 tr, ch 3, 4 tr.
Repeat the following sequence around:
3 dc in next space,
3 dc in next space,
(4 tr, ch 3, 4 tr) in next space.
Continue until you have made 4 corners.
Join with a sl st.
The motif should now clearly have a square shape.
Round 8 – Outer Square Border
Join the light gray yarn in any corner ch-3 space.
Work:
ch 3, 2 dc, ch 2, 3 dc
in the same corner space.
Work 1 dc in each stitch across the side.
When you reach the next corner ch-3 space, work:
3 dc, ch 2, 3 dc.
Continue around all four sides.
Join with a sl st to the beginning ch-3.
Fasten off.
Optional Openwork Border
The original image has a slightly more open, lacy appearance around the outside.
To create a similar effect, replace some of the dc stitches along each side with:
ch 1, sk 1, dc in next st.
You can alternate solid sections and chain spaces to make the outer frame lighter and more geometric.
At the corners, keep:
3 dc, ch 2, 3 dc
to maintain a strong square shape.
Creating the Raised Spiral Effect
The photographed square has a noticeable dimensional spiral in the center.
After completing the square, you can emphasize this effect with surface crochet.
Using lavender, plum, or gray yarn:
- Insert your hook into one of the center stitches.
- Pull up a loop.
- Work loose surface slip stitches around the center.
- Continue following the circular rounds outward.
- Gradually move from the center toward Round 5.
Do not pull the surface stitches too tightly.
The relaxed stitches will sit slightly above the fabric and create the beautiful raised spiral seen in the inspiration photo.
You can alternate colors while working outward for an even stronger spiral appearance.
Diagram
Optional Gold Stars
The tiny gold details are one of the prettiest features of the finished square.
Using gold yarn and a yarn needle, embroider several tiny stars around the blue sections.
A simple star can be made by stitching:
- one vertical stitch,
- one horizontal stitch,
- and two diagonal stitches
through the same center point.
Scatter approximately 5–8 stars around the motif.
Avoid making them perfectly symmetrical—the scattered arrangement gives the square its celestial look.
Blocking
Because the project changes from a circular center to a square exterior, blocking is especially helpful.
Lightly dampen the finished piece.
Pin all four corners into shape.
Make sure each side is straight and that the center remains flat.
Allow the square to dry completely before removing the pins.
Color Placement Idea
To create a version similar to the photograph, try:
Center: light gray
Inner spiral: plum
Second spiral: lavender
Main background: deep teal or navy
Outer accents: plum
Corners: silver gray
Details: metallic or mustard gold
This combination creates the beautiful night-sky / galaxy appearance of the inspiration square.
Spiral Galaxy Crochet Square PDF
Important Construction Tip
Before beginning Round 7, place four stitch markers evenly around the motif. These markers identify the four future corners.
This makes it much easier to keep the square symmetrical.
The basic construction is:
Circular center → textured rounds → 12 sections → four corners → square border.