Project Details
| Feature |
Original pattern information |
| Designer |
Glenda Winkleman |
| Published by |
Red Heart; available through Yarnspirations |
| Skill level |
Experienced |
| Finished size |
Approximately 44½ × 59½ inches, or 113 × 151 cm |
| Main techniques |
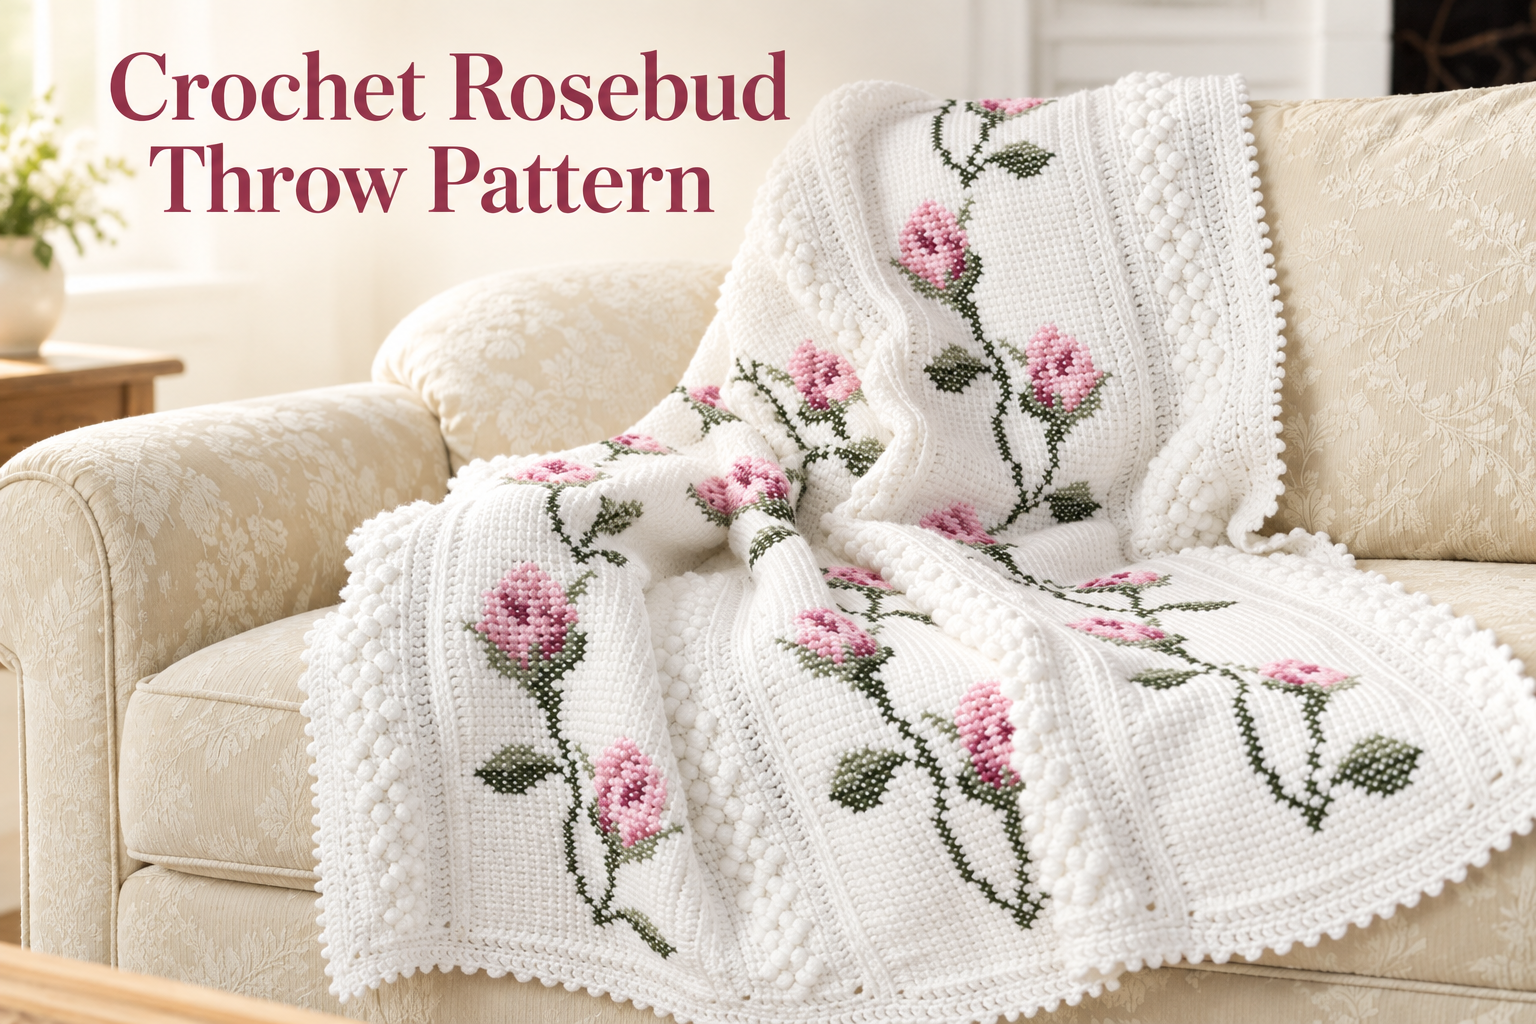
Tunisian crochet, bobbles, cross-stitch embroidery, and crochet edging |
| Construction |
Four textured panels and three embroidered panels, joined in alternating order |
The Yarnspirations pattern page identifies this as an experienced project. Allow yourself time to practice the unfamiliar techniques before beginning the full throw. A small sample is a useful place to learn how the crochet fabric and embroidery behave together.
Materials to Gather
The original pattern lists the following supplies:
- Red Heart Super Saver: 9 skeins of Soft White.
- Embroidery colors: 1 skein each of Dark Sage, Frosty Green, Country Rose, Rose Pink, and Baby Pink.
- A 6 mm (US J-10) afghan/Tunisian hook.
- A 6 mm (US J-10) regular crochet hook.
- A yarn needle.
Scissors, stitch markers, a measuring tape, and a row counter are useful additions to your project bag. Check your PDF and yarn labels before purchasing substitutes, since skein sizes and yardage can differ.
Keep the embroidery colors together with a labeled sample of each yarn. Attaching short strands to a small card makes it easier to distinguish similar pinks under different lighting. Leave space beside each strand to note its chart symbol or color name.
Abbreviations to Recognize
Keep this quick reference nearby when reading the pattern. These definitions use US crochet terminology.
| Abbreviation |
Meaning |
| ch |
Chain |
| sc |
Single crochet |
| dc |
Double crochet |
| slip st |
Slip stitch |
| st / sts |
Stitch / stitches |
| rnd |
Round |
| yo |
Yarn over |
Read the PDF’s special-stitch directions before making the textured sections. A stitch name alone may not tell you exactly how the designer wants it worked.
Prepare a Sample Before Starting
Begin with the gauge instructions in the PDF, checking both panel textures. Measure your sample on a flat surface without stretching it. If the measurements differ, adjust your hook or tension and try again before committing to a long panel.
Use a spare area of your sample to practice a few embroidered crosses. Aim for stitches that rest on the surface without pulling the crochet inward. If the fabric puckers, loosen the embroidery tension and compare the results. It is much easier to make that adjustment on a sample than on a completed floral panel.
A sample also gives you a chance to test your colors together. Place the palest pink beside the white background, then add the medium and dark shades. Check that you can distinguish them in ordinary room light. The rosebuds will have more definition when the shading remains visible after the yarn is stitched into place.
How the Throw Comes Together
The project moves through a clear sequence: crochet and edge the panels, cross-stitch the floral sections using the chart, join the alternating panels, and finish the outer border. Follow the PDF for all stitch counts, repeats, and joining details.
Organizing your work by stage can make a detailed blanket feel more manageable. Keep a checklist for each panel, with space to record your progress and any hook adjustments. Mark the top of each piece so that you can maintain a consistent orientation when arranging the throw.
Before joining, lay everything out on a clean surface and look at the complete arrangement. Check that the floral panels face the same way and that neighboring edges align comfortably. This is the best time to notice a misplaced piece or a difference that needs attention.
Tips for Neat Rosebud Embroidery
Good lighting makes a real difference when you are working several similar shades. Choose a comfortable place where you can see both the chart symbols and the crochet fabric clearly. Use a movable marker or a spare sheet of paper to keep track of your position on the chart.
Try to keep the upper diagonal of each cross-stitch facing the same direction. This gives the embroidery a more consistent surface. Work with manageable lengths of yarn, and pause if the strand begins to twist or tangle.
Check the back of your work regularly, too. Secure ends neatly and avoid pulling long strands tightly across the fabric. The goal is to let the throw remain flexible while keeping the embroidery tidy. A relaxed, even stitch usually looks better than one pulled firmly into place.
Choosing a Personal Color Palette
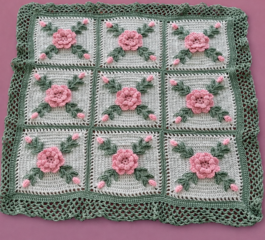
The white, pink, and green combination in the reference image is a natural fit for the rosebud design. If you would like a different mood, consider cream with dusty rose, ivory with peach, or a pale neutral background with deeper berry shades. These are styling ideas; follow the pattern’s color roles when planning a substitution.
Preserve a clear difference between the light, medium, and dark flower colors. Choosing three attractive yarns is only the first step: they also need enough contrast to describe the petals. Photographing the shades together in black and white can help you compare their relative lightness.
For the background, think about the room where the throw will be used. Bright white creates a crisp contrast, while a warmer cream can feel softer beside wood furniture and neutral upholstery. Test the full palette before buying enough yarn for the blanket.
Finishing and Caring for Your Throw
Give the finishing stage the same attention as the flowers. Check joins, secure loose ends, and inspect the edging before considering the project complete. Lay the throw flat to see whether any area needs gentle reshaping.
Follow the care instructions for the yarns you actually use. If you substitute fibers, test the intended washing and finishing method on your sample first. Keep a note of the yarn names and care information, especially if the finished blanket will be a gift.
A simple presentation lets the handiwork stand out. Fold the throw so that a floral panel and a textured band are both visible, or drape it loosely over a plain chair. The roses already provide the decoration; they need very little around them.
Crochet Rosebud Throw Pattern: Free PDF & Floral Ideas
The Crochet Rosebud Throw Pattern is a rewarding project for someone who enjoys careful details and the combination of crochet with embroidery. The work can be divided into manageable stages, and each finished panel brings the larger design a little closer.
Ready to begin? Download the free complete pattern PDF below for the original instructions and charts. Read through the full pattern, gather your colors, and make your gauge samples before starting the throw.