The downloadable pattern is a newly drafted adaptation of the reference photograph, with regularized measurements and shapes. It has not been physically test-sewn, so begin with one sample flower and one strip unit before cutting the entire project.
Materials You Will Need
Gather a mixture of small prints with enough contrast to distinguish the narrow strips and individual flower petals.
- Assorted prints: 5½ yards total for the patchwork, petals, and berry circles.
- White background: 3 yards.
- Assorted greens: ¾ yard for leaves and bias stems.
- Medium blue: one fat quarter for the vase bodies.
- Light blue print: one fat quarter for the vase rims.
- Dark fabric: ⅛ yard for the flower centers.
- Binding: an additional ¾ yard.
- Backing: 5½ yards of regular-width fabric.
- Batting: one 72 × 94-inch piece.
- Red rickrack: approximately 9 yards.
You will also need sewable lightweight fusible web, thread, fabric-marking tools, a rotary cutter, rulers, scissors, and an iron. The PDF includes instructions for preparing the stems and cutting the backing and binding.
Abbreviations: WOF means width of fabric, and RST means right sides together.
How to Make the Scrappy Flower Garden Quilt
1. Piece the colorful columns.
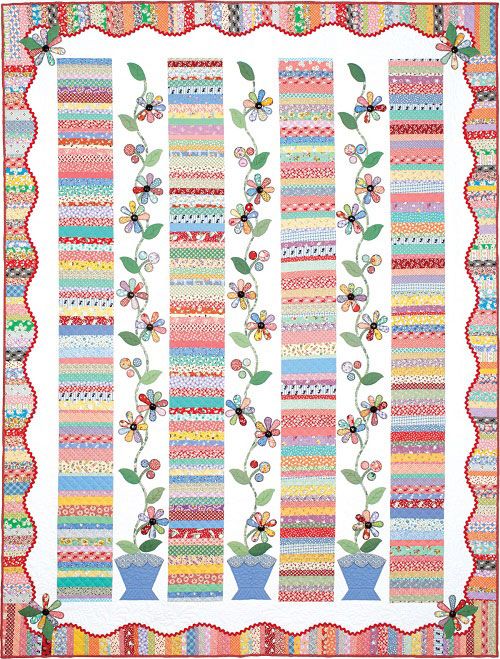
Each column contains twenty units made from four strips of different heights. Every unit uses the same four sizes, but you can change their order and fabric combinations. This creates variation while keeping the completed columns equal in length.
2. Prepare the floral backgrounds.
Start with oversized white panels and mark the finished design area. Assemble the printed placement sheets and transfer the stem paths, flower centers, and vase positions. The middle panel uses a slightly different arrangement for two of its flowers.
3. Add the appliqués.
Position the stems first, followed by leaves, berry circles, petals, and dark flower centers. Place the vase over the lower stem ends, then add its scalloped rim. Follow the PDF’s instructions for fusing and securing the exposed edges.
4. Assemble the quilt center.
Alternate the four pieced columns with the three completed floral panels. Keep the vases at the bottom and check the arrangement before joining the long seams. Measuring each section beforehand helps the columns meet evenly.
5. Finish the borders and binding.
Add the plain white borders, followed by the pieced piano-key borders. Apply the white wavy bands, red trim, and corner flowers. Finally, layer the quilt with batting and backing, quilt the layers, and bind the rectangular outer edge.
Choosing Fabrics for the Flowers
Small floral prints, dots, checks, and other compact patterns work well in the narrow strips and petals. A large motif may disappear when cut into a small appliqué, while a tiny print can remain visible across several shapes.
Keep the leaves within a coordinated range of greens to connect the three floral panels. The petals can introduce more variety: pink beside turquoise, yellow beside lavender, or cream beside red. Dark centers help define the flowers when neighboring petals have similar colors.
Organizing the Appliqué Pieces
Separate the pieces into labeled envelopes or trays for the left, middle, and right panels. Grouping the petals by flower number makes it easier to follow the color guide and check that each bloom has seven petals.
Keep the corner clusters separate from the tall vines. Each corner uses five petals and two leaves, so these motifs have a different arrangement. Checking the piece count before fusing can prevent an unnecessary correction later.
Download the Free PDF Pattern
The Scrappy Flower Garden Quilt Pattern PDF includes 30 pages with a colored quilt diagram, fabric requirements, cutting measurements, assembly instructions, and reusable appliqué masters. It also provides full-size vine placement sheets, a corner-flower guide, and stencils for the wavy border.
Download the free PDF pattern below and begin by checking the printed scale square. With the templates organized and a sample unit completed, you can build the quilt one colorful column and one floral panel at a time.
Scrappy Flower Garden Quilt Pattern | Free PDF
The Scrappy Flower Garden Quilt Pattern also offers a place for fabrics with personal meaning. A print left over from a previous quilt or a small piece shared by a friend can become part of a flower or a colorful strip. Distribute these special fabrics across the quilt so they appear in several areas, creating small connections between the patchwork columns and the appliqué panels. Keep a few notes about their origins if you would like to preserve those memories alongside the finished project.
The open white areas provide room to plan quilting that complements the flowers. You might sketch gentle curves around the stems or try simple lines beside the pieced columns before choosing your final approach. A photograph or a printed copy of the layout makes a useful surface for testing these ideas. Consider how the stitching will look across the whole quilt, while leaving the petals, leaves, and scalloped vase rims clearly visible.