- 20 squares measuring 4½” × 4½”
Use assorted dark or medium-value fabrics for these pieces.
Half-Square Triangles
You will need:
- 80 HST units
- Each HST should measure 2½” unfinished
- Each finishes at 2″
The original project uses an eight-at-a-time HST method.
For a conventional method, pair contrasting paw fabric and background squares, make the required HST units, and trim every unit accurately to 2½”.
Background Corner Squares
Cut:
Colored Side Rectangles
For each of the 20 blocks cut:
- 1 rectangle – 2½” × 8½”
- 1 rectangle – 2½” × 10½”
These strips create the strong colored L-shape visible around each paw.
You therefore need a total of:
- 20 rectangles – 2½” × 8½”
- 20 rectangles – 2½” × 10½”
The original project obtains these pieces from 2½”-wide strips or jelly-roll strips.
Corner Replacement Triangles
Cut:
Cut each square once diagonally to produce triangles.
These pieces are used to create the diagonal corner at the end of the colored strips.
Large Background Squares
Cut:
These fill the open areas surrounding the circular Bear Track arrangement.
Making One Bear Paw Unit
Begin with:
- 1 paw-center square – 4½” × 4½”
- 4 HST units – 2½” × 2½”
- background pieces as required
Arrange two HSTs along the top of the 4½” square.
The dark triangles should point toward the paw center.
Arrange another two HSTs along one side of the square.
When assembled, the four triangles create the recognizable claws of the Bear Paw.
Add the 2½” background corner square where the two rows of claws meet.
Press carefully so the unit remains square.
Adding the Track Strips
The modification that makes this design different from a standard Bear Paw block is the pair of colored strips surrounding two sides of the paw.
Attach:
- one 2½” × 8½” rectangle
- one 2½” × 10½” rectangle
to adjacent sides of the Bear Paw unit.
Together they form an L shape.
Before final assembly, one outer corner is replaced with a contrasting background triangle. The original maker used the Studio 180 Design Corner Pop method for this step.
You can reproduce the same visual effect with a standard stitch-and-flip method.
Stitch-and-Flip Corner
Place a background square or oversized triangle over the required corner of the colored rectangle.
Sew diagonally across the corner.
Trim the excess fabric, leaving approximately a ¼” seam allowance.
Press the replacement triangle outward.
Trim the unit carefully so the finished block measures:
10½” × 10½” unfinished
and
10″ × 10″ finished
Make 20 blocks.
Quilt Layout
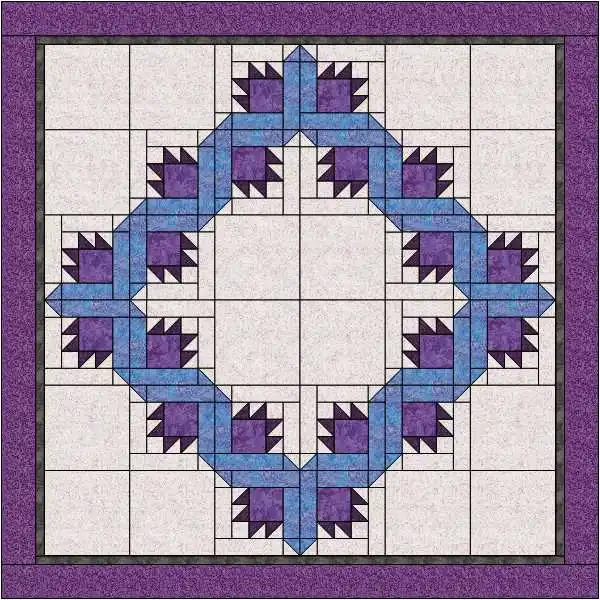
The quilt center is arranged as a 6 × 6 block grid.
Use:
B = Bear Track Block
A = Background Square
|
1 |
2 |
3 |
4 |
5 |
6 |
| Row 1 |
A |
A |
B |
B |
A |
A |
| Row 2 |
A |
B |
B |
B |
B |
A |
| Row 3 |
B |
B |
A |
A |
B |
B |
| Row 4 |
B |
B |
A |
A |
B |
B |
| Row 5 |
A |
B |
B |
B |
B |
A |
| Row 6 |
A |
A |
B |
B |
A |
A |
This accounts for exactly:
- 20 Bear Track blocks
- 16 background blocks
The important part is rotation.
Do not sew all 20 Bear Track blocks in the same orientation.
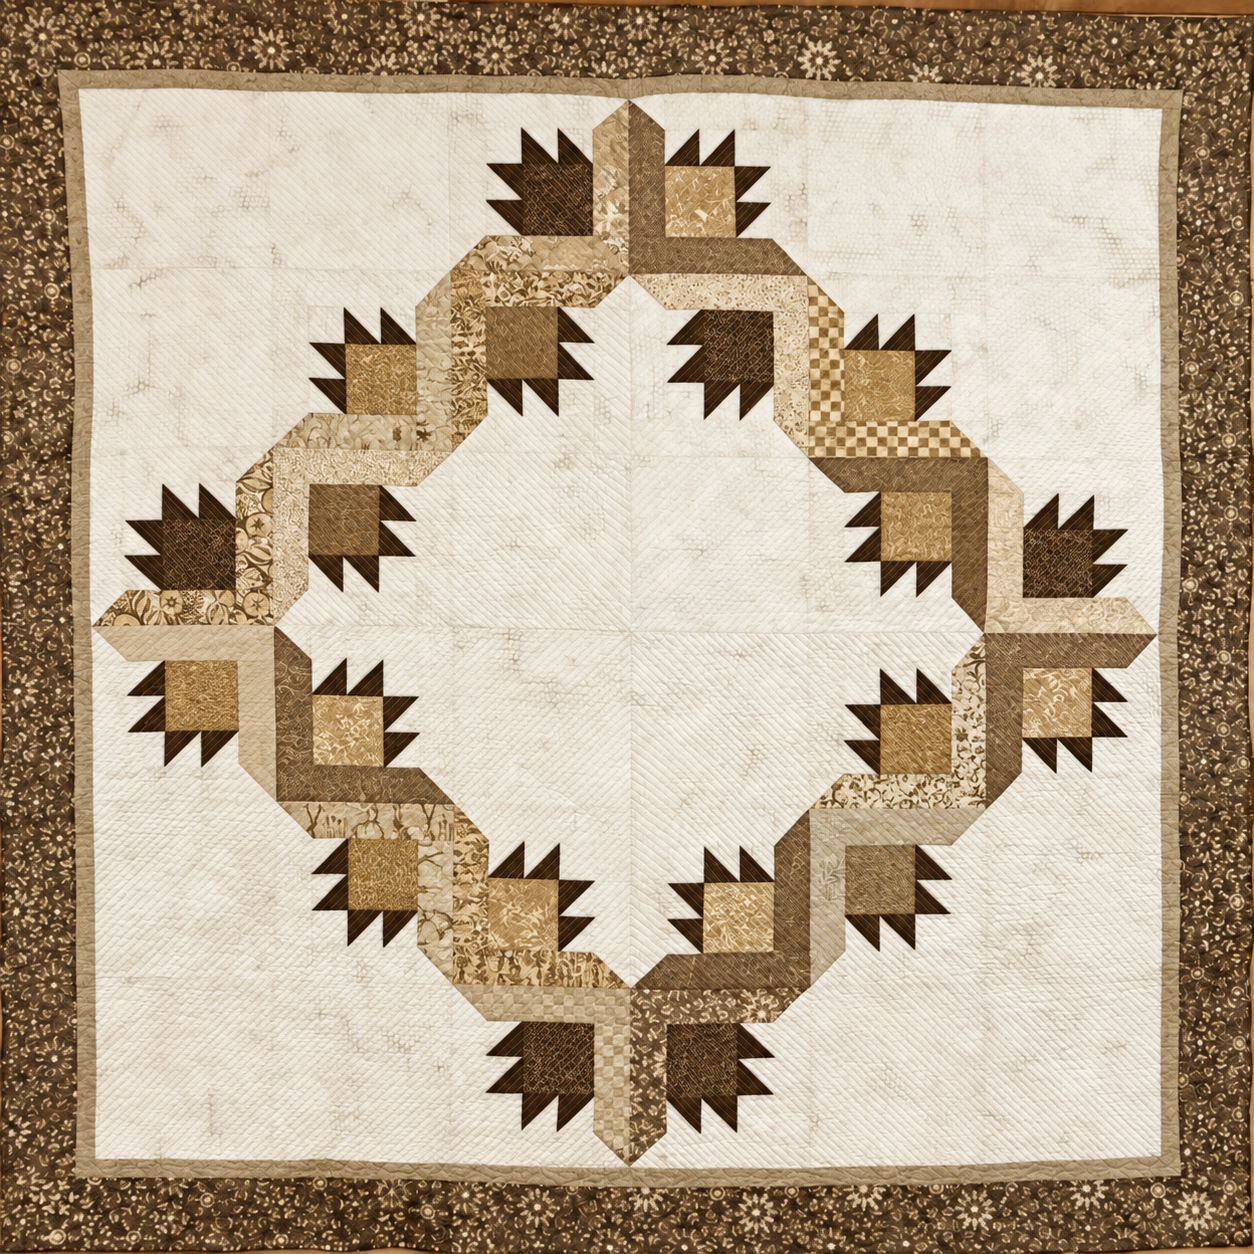
Rotate each block by 90°, 180° or 270° as needed so that the colored L-shaped sections form the continuous octagonal/ring effect visible in your reference photograph.
The paw sections then appear to travel around this ring.
The arrangement is one of the most distinctive features of the quilt.
Assemble the Quilt Center
Lay all 36 units on a design wall or large floor space before sewing.
Compare the arrangement carefully with the reference image.
Once you are satisfied with the rotations:
- Sew the six blocks in Row 1 together.
- Repeat for Rows 2–6.
- Press alternate rows in opposite directions.
- Sew the six completed rows together.
- Match intersections carefully.
The pieced center should measure approximately 60½” × 60½” unfinished.
Inner Border
The original supply list specifies:
Sew the side borders first.
Measure the quilt through the center rather than simply using the outer edge measurement.
Cut the borders to that measurement and attach.
Repeat for the top and bottom.
The inner border finishes approximately 1″ wide.
A teal, blue or green fabric works beautifully here because the narrow border visually separates the quilt center from the dark outer frame.
Outer Border
Cut:
Join strips as necessary.
Measure and attach the side borders first, followed by the top and bottom borders.
The outer border finishes approximately 4″ wide.
With both borders attached, the quilt should measure approximately:
70″ × 70″
which matches the finished measurement given by the original maker.
Quilting and Finishing
Layer:
- quilt top
- batting
- backing
Baste using your preferred method.
Because the center of this quilt has strong geometric movement, simple quilting can work very well.
Good choices include:
- straight-line quilting
- diagonal quilting
- stitch-in-the-ditch
- gentle free-motion meandering
- large continuous curves
One useful lesson from the original project is to be cautious with very dense quilting in the center combined with lighter quilting in the borders: uneven quilting density can cause distortion or waviness. The original maker specifically noted experiencing this issue. Square the quilt and bind using your preferred 2¼” or 2½” binding strips.
Construction Summary
20 Bear Track Blocks
↓
10″ finished each
↓
Arrange in a 6 × 6 grid with
16 background squares
↓
Rotate Bear Track blocks to create the ring
↓
Add 1″ finished inner border
↓
Add approximately 4″ finished outer border
↓
Finished Quilt: approximately 70″ × 70″
This quilt is also a great project for practicing half-square triangles. Because the Bear Paw units use several HSTs, accurate cutting, sewing, and trimming will make a noticeable difference in the finished quilt. Taking a little extra time during block construction will help the points line up neatly when the quilt top is assembled.
Bear Tracks Quilt Pattern – Free PDF and Tutorial
Before sewing the final rows together, it is helpful to place all of the blocks on a design wall or large surface. The Bear Track blocks must be rotated in different directions to create the circular effect around the center. Checking the layout carefully before stitching can prevent having to remove seams later.
Once completed, the Bear Tracks quilt has a beautiful combination of traditional patchwork and modern movement. At approximately 70″ × 70″, it is a versatile size for a large throw, sofa quilt, or decorative bed quilt. You can download the complete PDF pattern below and use the diagrams and cutting instructions to guide you through every step.