Quilt Size and Sewing Experience
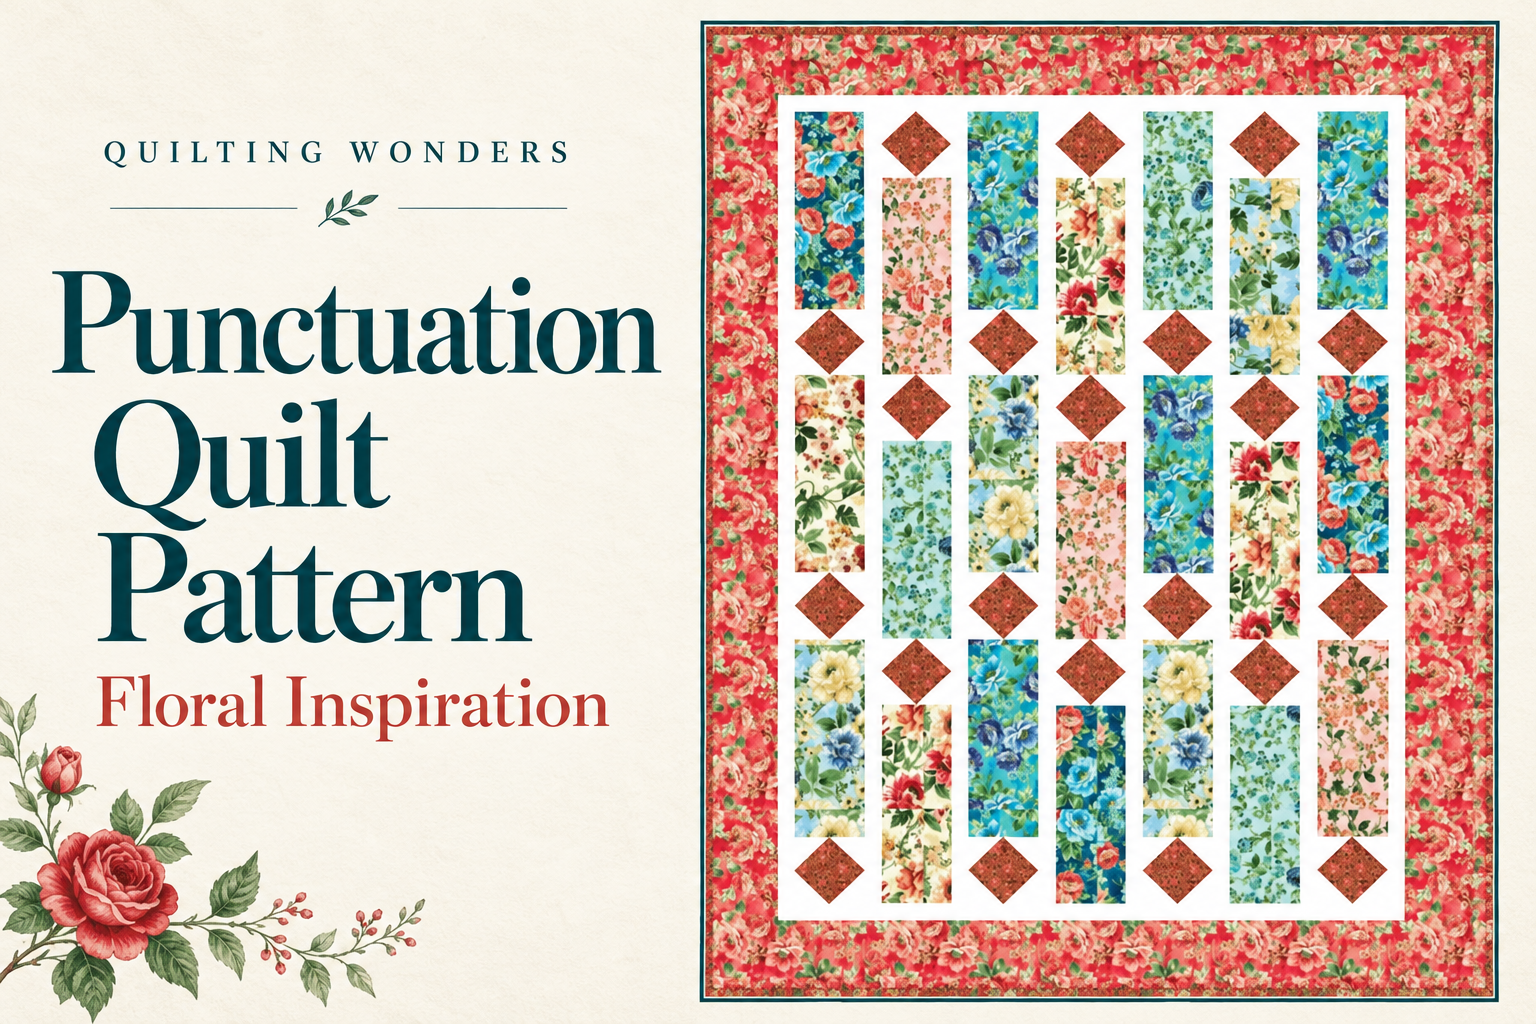
This adaptation produces an unquilted top measuring 44½ × 58½ inches, approximately 113 × 149 cm. The bound quilt should be close to that size, with some reduction possible from quilting and washing.
The construction suits a confident beginner who is comfortable with accurate ¼-inch seams, pressing, and measuring units before assembly. The diamond corners need particular care so their points remain crisp when the columns are joined.
The guide’s measurements and diagram scale have been checked digitally, but the adaptation has not been test-sewn. Make one diamond unit and check your seam allowance before cutting the full set.
Choosing Fabrics for Your Punctuation Quilt
Begin with a border print you love, then select six coordinating fabrics for the long rectangles. A useful mix includes light, medium, and dark backgrounds. In the reference, deeper teal and bright turquoise add contrast beside soft blush, pale aqua, mint, and cream.
Choose a red fabric for the diamonds that remains easy to distinguish from the white background. A small floral print or subtle texture will keep the diamond shape readable. Repeating red in the outer border makes those smaller accents feel connected to the whole quilt.
Before sewing, arrange all 21 rectangles on a design wall or a clean floor. Step back and look for clusters of similar colors. Moving one pale rectangle between two darker prints can change the balance without requiring another fabric. Photograph the arrangement so you can refer to it while joining the columns.
For directional flowers, mark the top of each rectangle with a removable label. All the floral prints can remain upright even though neighboring columns begin with different shapes.
Materials for the Photo-Based Adaptation
These amounts assume at least 40 inches of usable fabric width after removing selvages. Each fat quarter should provide at least 18 × 20 inches of usable fabric.
| Material |
Amount |
| Six coordinating floral prints |
1 fat quarter of each, or ¼ yard of each |
| White background, sashing, and inner border |
1¾ yards |
| Red fabric for the diamond centers |
½ yard |
| Red floral outer border |
1 yard |
| Binding fabric |
½ yard, additional to the border fabric |
| Backing fabric |
3¼ yards |
| Batting |
54 × 68 inches |
Allow additional fabric for fussy cutting, matching large motifs, or controlling print direction around the borders. You will also need a rotary cutter, ruler, cutting mat, iron, removable fabric marker, thread, and basting supplies.
In the instructions below, WOF means usable width of fabric and unfinished size means the measurement of a sewn unit before its outer seam allowances are used. All cutting dimensions already include the required seam allowances.
How the Quilt Comes Together
1. Cut and Label the Floral Rectangles
Cut 21 rectangles measuring 4½ × 12½ inches. Each rectangle occupies a 4 × 12-inch area in the assembled patchwork.
The PDF labels the six prints A through F and includes a placement chart. Fabrics A, B, and F each supply three rectangles; C, D, and E each supply four. With 18 inches of usable width, a fat quarter can supply four 4½-inch-wide rectangles, so square the fabric carefully before cutting.
Keep each column’s pieces together after arranging the colors. A simple numbered label prevents an accidental swap during assembly.
2. Make the Red Diamond Units
For all 21 units, cut 21 red squares at 4½ inches and 84 white squares at 2½ inches. Each unit uses one red square and four white corner squares.
Draw a diagonal line on the wrong side of each white square. Place white squares at two opposite corners of a red square, right sides together, and sew on the marked lines. Fold the white pieces outward and check that they cover the corners before trimming the concealed excess, leaving a ¼-inch seam allowance. Press, then repeat at the remaining two corners.
The completed unit should measure 4½ inches square. Its red points sit ¼ inch inside the raw edges, leaving space for the joining seams. Check the first unit against the full-size diagram in the PDF before making the other 20.
3. Build the Seven Columns
Use a ¼-inch seam allowance throughout the patchwork. Arrange the units from top to bottom as follows:
| Columns |
Order from top to bottom |
| 1, 3, 5, and 7 |
Rectangle, diamond, rectangle, diamond, rectangle, diamond |
| 2, 4, and 6 |
Diamond, rectangle, diamond, rectangle, diamond, rectangle |
Join the six pieces in each column and press without stretching the fabric. Each completed column should measure 4½ × 48½ inches.
Change the order of the pieces in neighboring columns while keeping directional flowers upright. Check the diamond points as you sew; consistent seams preserve both the points and the overall column length.
4. Add the White Sashing
Cut and piece six white strips measuring 1½ × 48½ inches. Place one between each pair of columns, then join the center in its numbered order.
Match the ends and centers of each long seam and add pins between them to keep the layers aligned. The assembled center should measure 34½ × 48½ inches. If the measurement differs substantially, check the column lengths and seam allowances before adding borders.
5. Frame the Center with Two Borders
Add the white inner border first, followed by the red floral outer border. The planned cutting sizes are:
| Border |
Side strips: cut 2 |
Top and bottom strips: cut 2 |
| White inner border |
1½ × 48½ inches |
1½ × 36½ inches |
| Red floral outer border |
4½ × 50½ inches |
4½ × 44½ inches |
Attach the side strips before the top and bottom strips for each border. Measure through the center of the quilt at every stage and fit the border lengths to your actual top if there are small sewing variations.
The white border brings the top to 36½ × 50½ inches. After adding the floral border, it should measure 44½ × 58½ inches. Pinning the borders to measured lengths helps the edges lie flat.
Quilting and Binding Ideas
Straight lines beside the sashing can emphasize the vertical arrangement. A gentle allover curve gives a softer effect, while simple outlines around the diamonds draw attention to the red accents. Consider how visible you want the stitching to be against the floral prints when choosing thread color.
Prepare the backing and batting at 54 × 68 inches, giving approximately 4¾ inches of extra material on every side of the top. The PDF includes a pieced-backing plan using standard-width fabric. If a longarm quilter will finish the project, confirm their backing and batting requirements first.
Smooth and baste the layers, then quilt at a spacing suitable for your batting. After quilting, square the edges while preserving the outer border. Six 2½-inch × WOF binding strips provide enough length for this adaptation when the usable WOF is at least 40 inches.
Red binding continues the border’s warm color, while deep teal would pick up the cooler floral prints. Lay a folded sample along the quilt edge before choosing the final fabric.
Download the Free Photo-Based Sewing Guide
The 12-page PDF includes the cutting chart, fabric placement map, diamond construction diagrams, column arrangements, border measurements, backing and binding guidance, and a blank coloring layout.
Punctuation Quilt Pattern
Print page 11 at Actual Size or 100% before using its full-size diamond check. The calibration square must measure exactly 1 × 1 inch. The guide’s measured diagrams are the reference for construction; the decorative blog cover is an illustration.
Whether you choose romantic roses, bright garden prints, or a quieter collection of small florals, take time to enjoy the fabric arrangement before sewing. The alternating rectangles and diamonds give the quilt its rhythm, while your colors make the finished piece your own.